Last week I was looking for a quick project to take on the go with me, and saw a post on Instragram from Darn Good Yarn, about a mat made with their banana fiber. I had some pretty Red Heart Boutique hand spun Silk Sari yarn in 'charming' that had been languishing in my stash for want of a project and decided to give it a go. I downloaded the free pattern, and started hooking. Sadly it just wasn't working for me as written, with this particular yarn. I ended up frogging the whole thing (not easy with this yarn!), and starting over.
I increased the number of stitches in Round 1 to 12, and in Round 2 to 24. This led to more loops in the finished piece, but I compensated by reducing the number of chain spaces between double crochets in later rounds. Finally, I didn't have quite enough yarn to do all the rounds, so I ended up doing the first 7, then doing a round of picots & slip stitches. It was a bit more frustrating that I had hoped for when I picked the pattern to take out with me, but I'm happy with how it came out, and plan to try it again with another sari yarn in my stash.
Tuesday, April 24, 2018
Monday, April 23, 2018
Tealberry Moon Shawl & the Story of the Shawl-Along
After making my first virus shawl, I was asked by a few other hookers over on Craftster, to start a virus shawl-along. So I did, and I enjoyed seeing other folks try the pattern for the first time, but I kind of thought that the craftalong would peter out after people had tried it once or twice. The group of folks involved are some of my favorite people on Craftster, and I should have known better than to doubt them! A few weeks back, after we had each mentioned other shawl patterns we wanted to try, and shared links of our other work with each other, someone suggested changing our focus to be on shawls in general, instead of based on a specific pattern.
Everyone seemed keen on the idea, so I did that too. Soon we had a long list of new patterns suggested by the members, and the thread became one of the most active that I follow outside the HP Craftalong. Then I was inspired by kittykill's hoopla-along, to add a challenge element. Instead of the monthly challenges she holds on the Needlework board, we decided to try 4 month long challenges, to give folks plenty of time on intricate patterns. Our first challenge theme was picked at random from the list of suggestions, and was craft from stash. Most folks are excited about it, though I admit, I'm having trouble with it because I generally don't keep that much stash yarn around, that isn't for a specific project.
And in the midst of all this, plus resetting my studio and working on stash busting from all my supplies, I had to go to Michael's to pick up some frames. I was almost safely out of the store, when I passed a bin of clearance yarn, including 5 skeins of Unforgettable in Tealberry, and 5 more in Polo. Since I've been lusting after both colorways for ages, I snapped them up. So now, instead of stash busting out a shawl to fulfill my own challenge, I've increased my stash by 10 skeins of yarn!
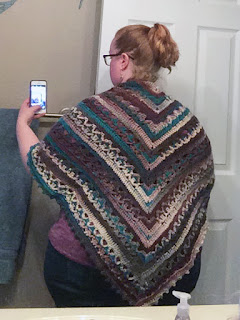
Rather than allowing it to end up in a drawer or bin, languishing, I decided to whip up a shawl for my mom, who always seems to be cold lately. The pattern is the Lunar Crossings Shawl by Crochet Kim. I love how quickly and easily it worked up. I used 2.6 skeins of Red Heart Unforgettable, in Tealberry, and it's a generous size. I did 6 full repeats of the motif, then on the 7th I did rows 7-11 as written in the pattern, then added a row of single crochet, placing 4 sc in the point. After that I added a row of modified picot stitches, starting with a picot in the first space, then doing 3 sc, repeating to the point where I started the picot in the 3rd sc and completed it in the 3rd sc so it would be centered, then continuing as before. To do the modified picot, ch 4, then place your hook in the left side of the 'V' of the first ch, AND through the top of the next stitch (3 loops on hook), yarn over, and pull through all 3 loops.
Friday, April 6, 2018
A Rainbow to Follow the Rain
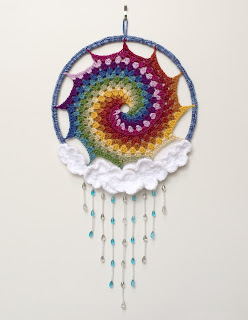
So excited to share this! I've been working on it for a few weeks now, having made a prototype, then frogged it, then made a new prototype, and finally this version. The rainbow is a crocheted granny spiral, and the clouds are crocheted appliques. The rain is crystal teardrop beads and glass seed beads strung onto beading wire. The metal hoop is 14” across, and there are 12 colors of yarn in the spiral.
The clouds were crocheted from Buttercream Luxe, in white, and the rainbow from a mix of Caron Simply Soft, Vanna's Choice, Lion Brand Heartland, Bernat Satin, Red Heart Soft Solids, and Red Heart Super Saver. The Granny Spiral pattern costs $1, and can be found HERE. The Cloud Appliques pattern can be found HERE.
The clouds were crocheted from Buttercream Luxe, in white, and the rainbow from a mix of Caron Simply Soft, Vanna's Choice, Lion Brand Heartland, Bernat Satin, Red Heart Soft Solids, and Red Heart Super Saver. The Granny Spiral pattern costs $1, and can be found HERE. The Cloud Appliques pattern can be found HERE.
Thursday, April 5, 2018
Infinite Rainbow Scarf
A few weeks ago, I made a rainbow ripples neckwarmer from some silk roving yarn that I received in my monthly subscription box from Darn Good Yarn. A friend saw me working on it, and freaked out over how much she liked the colors. Clearly, it had to go to her! But I wanted to add something like a hat to go with it, afraid the neckwarmer alone wouldn't go with anything else she might have, so I contacted DGY, and asked if I could buy another skein. The customer service person directed me to their regular listing for their worsted weight silk roving, in 'watercolors'. The picture didn't look exactly like my yarn, but I figured if customer service told me that was it, than that was it, and that perhaps someone working on the website had photoshopped the picture to look a bit more vivid. So I ordered 2 skeins. When they arrived I was very sad that they were not at all the same color. But rather than cry over spilled yarn, I decided to find a different way to use it up to make something bright and cheerful. This is the result. The pattern is the Dragonfly Infinity Scarf (aka Double V-Stitch Infinity scarf) by Alyssa on Undeniable Glitter. Since I was working with a limited amount of yarn, I made it a bit narrower, just 3 full-shells in the middle and 2 half-shells on the ends. Wrapped twice it sits up close to the neck, rather than hang down over your boobs, but is still plenty loose for comfort.
*Also, I just got new glasses, and I'm trying to get used to them. Every time I see myself in them I think I look like me, but in some sort of disguise. Like this is my Clark Kent look...
Monday, April 2, 2018
Be the Sparkle Unicorn You Want to See in the World
I believe it was either Ghandi or Princess Rainicorn who said, “Be the Sparkle Unicorn you want to see in the world.”
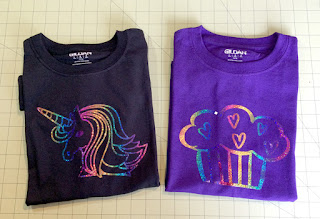
These are a few more projects created for Craftster's April Fool's Day celebrations. The image and text were cut from rainbow holographic heat transfer vinyl that I found on Amazon. The unicorn design is from the Silhouette store, but I added some extra butterflies, clovers, and stars into the grass area, because I was afraid it would be too big of a solid chunk of HTV.
There was plenty more htv leftover, so I made some tees for my nieces, Ari & Mia. Ari adores unicorns, so she got that one, while Mia is the Queen of Cupcakes. I cant wait to mail these off to them, along with some of the Unicorn & Mermaid Cookie Mixes.
Sunday, April 1, 2018
Unicorn & Mermaid Cookie Mix in a Jar!
These were created in honor of Craftster's annual April Fool's Day celebrations. Our theme was Unicornicopia, so I created both Unicorn & Mermaid Cookie Mixes in a Jar. One of each will be going to my lovely nieces, one to my neighbor, and one of a unicorn-obsessed friend. Jar mixes have always made great gifts, and these are an awesome way to introduce kids to baking. Or just to amuse the princesses and mermaids in your life. I've done the tutorial with the Mermaid cookie mix, but the unicorn one is nearly identical, so I've listed any changes in parentheses.
Ingredients - listed per single jar of cookie mix
1 1/2 cups all purpose flour
1 teaspoon baking powder
1/2 teaspoon baking soda
1/4 teaspoon salt
1/2 cup granulated sugar
Gel food colorings
1/3 cup light brown sugar packed
½ cup EACH pearl chocolate candies in green and blue
(These are sixlets, found in cake decorating area of grocery stores or the wedding/party cake area in Walmart)
1 - 1.5 cup white chocolate chips
Sprinkles (if desired, used in Unicorn Cookie jars)
1-quart Mason jar
Mix the flour, baking powder, baking soda, and salt in a bowl. Whisk to combine.
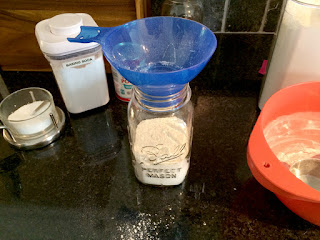
Use a canning funnel, (or a rolled sheet of paper turned into a funnel) to pour in the flour.
At this point you need to check on your flour, because it will be in an uneven layer. Shake jar to evenly distribute the flour mix, then tap gently on the counter several times to get the flour to settle and pack itself in. If need be, use a spoon to lightly pack it down a bit further.
Pour your granulated sugar into a bowl, and add 2 drops of your blue gel food coloring. Mix really well, to evenly distribute the color. (For unicorn cookies tint your sugar pink or purple.) You may need to add more gel color to get your desired shade. I believe I used about 4 or 5 drops to get this shade of blue. Note: The coloring washed right off of my bowl & spoon, but just in case, don't use your brand new expensive white plastic bowls!
Use the funnel again, to pour your sugar layer on. I found that pouring my sugar around the edges of the funnel (rather than straight down) gave me a much more even layer. Again, tap your jar gently on the counter to settle the sugar layer.
Same deal with your brown sugar. I found that sprinkling it in by hand (since it had been packed into the measuring cup), allowed me to distribute it more evenly.
Now, use a spoon to tamp the brown sugar down, packing it more firmly around the edges of the jar, and leaving a small (but still packed) hill in the middle. (This is so that when we pour in our round pearl candies next, we will see more of them through the jar, as they will pool in the lower edges.) The act of packing it into the jar, also will help form a seal of brown sugar, keeping the blue granulated sugar and flour in place, rather than letting them spill into the candies above.
Pour in your green sixlets into the jar, and gently shake to evenly distribute. (For unicorn cookies pour in purple, white & silver sixlets, purple sugar pearls. Then add 1 Tablespoon of rainbow pearl sprinkles, allowing them to settle down in between the sixlets.)
Next layer in 1 cup of your white chocolate chips. (Same for Unicorn cookies.) On top of these add your blue sixlets. (For unicorn cookies then add rainbow heart candies or more sixlets.) Now, if you have any space left in the top of your jar, fill it in with more white chocolate chips. You want the jars to be packed pretty tight, so that the layers don't get mixed up.
Make some cute tags with the instructions for baking, and decorate the jars with a square of pretty cloth, or with ribbons or yarn. I created my tags with my Silhouette Cameo, cutting background tags out of purple and teal cardstock, then layering lacy cream paper with the recipe over them, and tying them all on with seam binding and fluffy yarns from my stash.
RECIPE TO INCLUDE WITH THE JAR:
[i]-Pour the contents of the jar into a large bowl and stir to combine. Add 1/2 cup of barely melted (not hot) unsalted butter, 1 beaten egg, and 2 teaspoons vanilla extract. Stir until combined. Chill for 30 minutes.
-Make golf ball sized portions of dough and place the dough balls onto lined baking sheets. Bake at 350°F for 8-10 minutes, until the centers of the cookies are just barely set.[/i]
And there you are, all ready for gift giving.
Subscribe to:
Posts (Atom)


