Showing posts with label bulky crochet. Show all posts

Wednesday, September 16, 2020

Hygge Throw

My very lovely friend PerfectlyBohemian on Lettuce Craft, sent me 10 skeins of beautiful Sugar Bush Canoe yarn in this pretty lilac purple color.   She had rescued the yarn from a tent sale, but didn't know what to make with it, so sent it to me.  10 skeins was a lot, more than I needed to make a sweater or hat, but not quite enough to make an afghan.  After doing some digging around online I found an awesome throw pattern for free, called the [Hygge Holiday Throw](https://makeanddocrew.com/hygge-free-beginner-crochet-blanket-pattern/) that was just about perfect for the amount of purple I had.  I found few more balls in a contrasting mulberry color on Zulily, and set to work.

It's about 36" wide with the added border, and about 50" long.  (I'm guessing.  My dining table that it's laying on is 3'x5'). 

When I got to the end of the pattern, it called for a single border of mulberry, but I had 1.5 skeins of purple, and 1.75 of mulberry left, so I decided to add to the border in an effort to use up as much of the yarn as possible.  After the initial border, I did a second round of single crochet in mulberry, then a round of double crochet in purple, and finally 2 more rows of single crochet in mulberry.  I had *just* enough mulberry for the tassels, but not the ties on the tassels, so I did those with some of the leftover purple for contrast, and love how they look.


Monday, March 4, 2019

Vintage Market Tote


Quick little impromptu project.  I've been working on the Spill Shawl, but ran out of yarn.  Since I can't be without a project, I dug through my stash to see what I around the house.  I found 1.5 skeins of Bernat Maker Home Dec in my stash, that I had bought for a project and later changed my mind about.  I decided to use it up by making the Vintage Market Tote pattern I had seen on Ravelry.  The pattern works up simply and quickly, and makes for a nice gift.  This one is going to my mom for her birthday, along with some handmade dishcloths & scrubbies.


Friday, January 4, 2019

Chunky Feather & Fan Afghan

I finally finished my monster afghan!   I made it for my couch, mainly for my husband during his occasional couch naps.  I've had a small lapghan that [member]pinkleo[/member] made me years ago on the back of the couch, and Jim would snuggle with it whenever he's there watching tv or playing video games.  Problem was that pinks made it for 4'11" me, and not for 6'3" Jim.  It basically covered his feet to mid-thigh.  This afghan on the other hand is HUGE, and can snuggle him from just under his chin, to all the way past his toes, and tucked around under his feet.  It's just shy of 5' wide, and a bit over 7' tall!


The pattern is the Chunky Feather & Fan Throw, and is free.  I tried the 15mm hook that the pattern recommended, but I didn't like how it was coming out, so I switched to a 12mm, and it was fantastic.  Still a little bit lacy, but not so much that Jim will put fingers and toes through it.  Since I went down a hook size though, I did alter my afghan to be 1 scallop wider.  (This is done by simply adding 17 ch to the foundation chains, for each extra scallop you wish to add.)


The yarn is Caron Tea Cakes in Pumpkin Chai.  Caron discontinued it, so I bought all 7 cakes they had on clearance at Michael's for $4.95 each and assumed that would be plenty, since several folks I had seen make one on Ravelry had used 6 cakes. But with the addition of that extra scallop, by the time I got through 6 cakes, I could tell that my afghan would basically be a square rather than a rectangle, so I went in search of a few more cakes.  Found a bunch on eBay being sold for a fortune, and bid on the cheapest which was $13 plus shipping.  The seller then contacted me and offered me 2 cakes that she had lost the bands for, for just $8 with shipping!  Woot!  So overall it ended up being 9 cakes, about 1836 yards of super-bulky weight yarn.


The only thing I disliked about this project, was the sheer size.  It took up my entire dining table when I was working on it, and it was too big for any of my project bags.  I'm so glad it's out of my WIP pile, and finally in its new home on the couch. 


Friday, July 27, 2018

Scrappy Shawls for Alice's Embrace

The awesome ladies of the Crochet Shawl-Along have inspired me to stash bust out a few scrappy shawls from my bits and bobs of Lion Brand Homespun.  The pattern is the Yarrow Triangle Scarf.  These two will go to a charity called [url=http://alicesembrace.org/]Alice's Embrace[/url], that provides shawls and lap blankets for Alzheimer's patients.  Bonus: Now I have an entire yarn drawer free!


Sunday, October 8, 2017

Giant Granny Square for the Welcome Blanket Project


Lately I've been feeling like the world is going off the rails.  With mass shootings, neo-Nazis marching in the streets, the threat of a possible nuclear war, and the very deep political divides in our country, it has been hard to find hope.  As social media brings us a constant stream of the worst news the world has to offer, it has been difficult not to feel powerless and alone.  So in a conscious effort to put some more love and goodness into the world, I decided to participate in the Welcome Blanket Project and create a Welcome Blanket as a gift for an immigrant family as they arrive in America.  In case you are unfamiliar with the project, here is an explanation from their own website:

The proposed border wall between the United States and Mexico is almost 2000 miles long. Imagine if the massive distance of this wall was re-conceptualized and re-contextualized not to divide, but to include. Instead of wall, a concrete line, to keep people out, what if lines of yarn became 3,500,640 yards of blankets to welcome people in?

A welcome blanket is traditionally created to lovingly mark the arrival of a new person into the world. In the Welcome Blanket project, each handmade blanket is a physical manifestation of this celebration of new refugees and other immigrants: “Welcome to the United States and your new life here! We are so glad you have arrived.”


Their mission of inclusivity, hope, and love in the face of racism and islamophobia truly touched my heart, and I couldn't think of a better way to pour some more goodness into the world than to make a special gift for a stranger whom I'll probably never meet.  So I dug through my yarn stash, grabbed a crochet hook, and started in on a thick, squishy, warm, cuddly blanket, and tried to work my love and my hope for a better life for the person who receives it, into each stitch.  And since this challenge is about sharing more love, I've also included that pattern/tutorial for making a giant granny square afghan of your own, either to donate to the Welcome Blanket Project, or for friends and family in your own lives.


Much like my Mrs. Weasley Burrow Afghan and Nebula Afghan, this afghan is made by holding 2 strands of bulky weight (Lion Brand Homespun) yarn together, and was crocheted with a 12mm hook.  This results in a very thick blanket, that works up quickly, but you can also use the same method with thinner yarn and a smaller hook.  It will simply take more rounds to get a big enough blanket.  The ombre effect was created by switching out 1 strand of yarn at a time, while leaving the other strand, so that the colors blend into one another.  It took 14.5 skeins of Homespun, 10.5 of which came from my stash.


Giant Granny Square Afghan

Suggested Yarn: Lion Brand Homespun
Hook: 12mm

Colors Used:
A. 2 skeins Opal (Bright Teal)
B. 1.5 skeins Waterfall (Light Blue)
C. 2.5 skeins Deco (Ivory)
D. 2 skeins Lagoon (Dark Teal-Green)
E. 1 skein Windsor (Grey Blue)
F. 1.5 skeins Edwardian (Grey)
G. 2 skeins Black
H. 2 skeins Tourmaline (Slate)

Create a slip knot.  With colors A & B held as one, chain 4; join with slip stitch in dream chain to form a ring.

[b]Round 1:[/b] Chain 3, 2 double crochet in ring, *chain 2, 3 double crochet in ring; repeat from * twice more, chain 2; join with slip stitch in top of beginning chain.

[b]Round 2:[/b] Slip stitch in next 2 double crochet, slip stitch in dream chain-2 space, chain 3, (2 double crochet, chain 2, 3 double crochet) in same chain-2 space, *chain 1, (3 double crochet, chain 2, 3 double crochet) in next chain-2 space; repeat from * twice more, chain 1; join with slip stitch in top of beginning chain. Slip stitch in next 2 double crochet.  Drop color A (Opal), and add in color C (Deco).

[b]Round 3:[/b] Slip stitch in chain-2 space, chain 3, (2 double crochet, chain 2, 3 double crochet) in same chain-2 space, *chain 1, 3 double crochet in next chain-1 space, chain 1, (3 double crochet, chain 2, 3 double crochet) in next chain-2 space; repeat from * twice more, 3 double crochet in next ch -1 space, chain 1; join with slip stitch in top of beginning chain. Slip stitch in next 2 double crochet. Drop color B (Waterfall), and add in color D (Lagoon).

[b]Round 4:[/b] Slip stitch in chain-2 space, chain 3, (2 double crochet, chain 2, 3 double crochet) in same chain-2 space, *(chain 1, 3 double crochet in next chain-1 space) across to next chain-2 space, chain 1, (3 double crochet, chain 2, 3 double crochet) in next chain -2 space; repeat from * twice more, (chain 1, 3 double crochet in next chain-1 space) across to dream chain-2 space, chain 1; join with slip stitch in top of beginning chain. Slip stitch in next 2 double crochet. Drop color C, and add in color E (Windsor).

[b]Round 5:[/b] Slip stitch in chain-2 space, chain 3, (2 double crochet, chain 2, 3 double crochet) in same chain-2 space, *(chain 1, 3 double crochet in next chain-1 space) across to next chain-2 space, chain 1, (3 double crochet, chain 2, 3 double crochet) in next chain -2 space; repeat from * twice more, (chain 1, 3 double crochet in next chain-1 space) across to dream chain-2 space, chain 1; join with slip stitch in top of beginning chain. Slip stitch in next 2 double crochet. Drop color D, and add in color F (Edwardian).

Repeat Round 5, following Color Sequence, with 1 more 3-double crochet group on each side every round until afghan measures 50 in. square, or your desired size. If desired, add a row of single crochet along the outside edge to give a finished look, placing a single crochet stitch in each double crochet and each chain 1 space, and 3 single crochet stitches in each corner.  Fasten off.  Weave in ends.

Color Sequence:
Row 1: Opal and Waterfall
Row 2: Opal and Waterfall
Row 3: Waterfall and Deco
Row 4: Deco and Lagoon 
Row 5: Lagoon and Windsor 
Row 6: Windsor and Edwardian
Row 7: Edwardian and Lagoon
Row 8: Lagoon and Black
Row 9: Lagoon and Tourmaline 
Row 10: Tourmaline and Deco
Row 11: Deco and Waterfall
Row 12: Waterfall and Opal
Row 13: Opal and Edwadian
Row 14: Edwardian and Lagoon
Row 15: Lagoon and Black
Row 16: Black and Tourmaline
Row 17: Tourmaline and Edwardian
Row 18: Tourmaline and Opal
Row 19: Tourmaline and Waterfall
Row 20: Waterfall and Deco
Row 21: Deco and Deco
Row 22: Deco (Finishing row of single crochet)


Naturally, as soon as I had the blanket laid out nice and straight to take a picture of, my dog came running in and plopped herself down on top of it, because all blankets on the planet belong to her.  The face she is making came right after being told to get off of mum's newest creation. 

Thursday, September 1, 2016

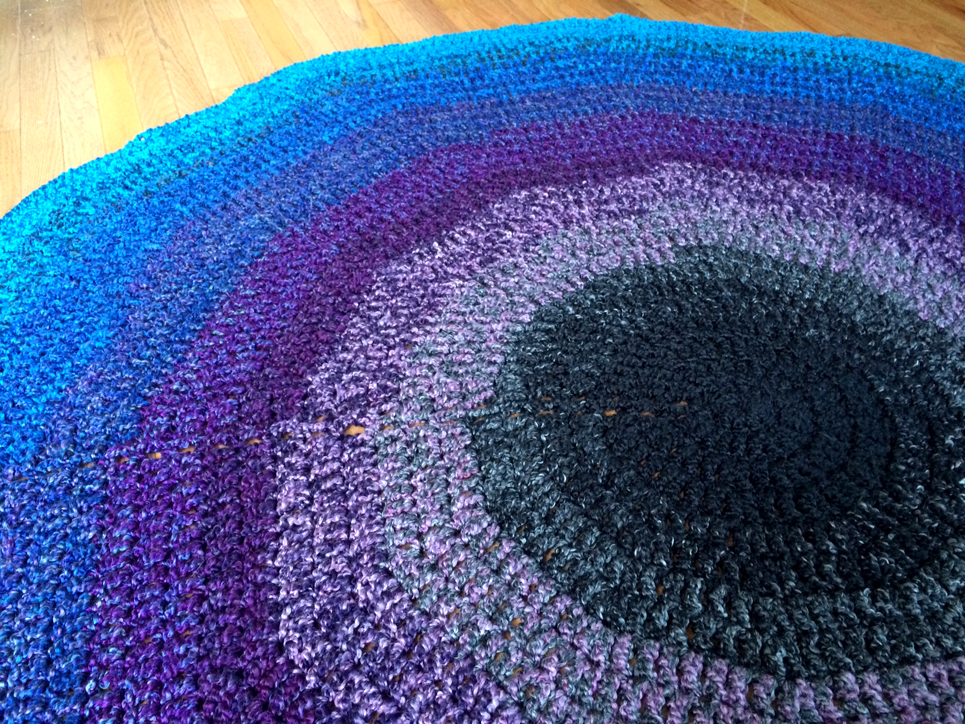
Nebula Afghan

 A few months ago I created a Mrs. Weasley Inspired Burrow Afghan for sheepBlue in the I Want to Live in the Burrow Swap.  The project helped me use up a great deal of my stash of Homespun yarn, but I still had so many skeins left over.  So I decided to use up some more of them by creating a new afghan for a friend who is battling cancer.

The pattern is the Kew Gardens Afghan from Lion Brand yarn.  But for this one, like in the Burrow afghan, I created it by holding 2 strands of yarn together, changing out one strand of color at a time in order to blend the colors from black, through grey, purple, blue, teal, and aqua.

All told it took about 20 skeins of yarn and it weighs a TON!  


And finally, one more shot with my pup, looking completely unimpressed.


Saturday, July 16, 2016

Mrs. Weasley Inspired Burrow Afghan

 I recently organized & participated in the I Want to Live in the Burrow Swap, which was a housewares swap, inspired by the world of Harry Potter.  Participants could make HP themed houseware items, or items that felt like they could be found in the Burrow, the house of the Weasley family.  I had the good fortune to be partnered up with sheepBlue, one of my Craftsgter Crushes.  She mentioned enjoying blankets to snuggle up with in the winter, and loving Mrs. Weasley's scrappy style, so I clearly had to make her a Weasley Afghan!

I dug through my stash and found that I had a lot of skeins of Lion Brand Homespun yarn in a mix of colors.  And though I searched through many patterns trying to find a scrappy way to use the mixed up colors, I just couldn't find anything that worked with the varying amounts I had of each.  Many of the colors have been discontinued so I couldn't buy more of them.  In the end I decided to try combining elements of a few different patterns I had seen, to try to make something work with what I had on hand, just like Mrs. Weasley would do.  The two main patterns I was inspired by were the Lazy Girl Crochet Blanket, which used 2 strands of super bulky yarn crocheted together in a V-Stich, and the Fast and Easy Crochet Throw, which used 4 strands of worsted weight yarn that changed out one strand color at a time to get an ombre effect. 

I used 2 strands of bulky weight, held together and crocheted in the V-Stitch.  It's made up of approximately 14-15 skeins of yarn, 9.5 of which were from my stash.  I bought 2 brand new skeins in Barley, and 4 partial skeins of various colors on eBay for about .80 cents each.  Each partial skein was somewhere between 1/2 and 7/8 of a full skein.  To create the ombre effect, you'll have to think about what colors you have, how much you have of each, and how you'd like them to progress.  I started by laying them all out and creating a "rainbow" or color wheel.  Then I made myself a vague chart, based on the number of rows I planned to do, and how I wanted the shades of color to blend.  I've included it below, but if you do this on your own, yours will vary based on what colors and amounts you have on hand.

Here's a close up of the ombre effect created by swapping out 1 strand of yarn at a time.

If you want to try this yourself, here's the basic directions for making a V-Stitch Afghan.  My "afghan" is actually big enough to cover the top of a queen sized bet!  Somewhere in the vicinity of 60"x80".  You can size yours up or down from mine, simply by increasing or decreasing your initial chain by mulitples of 6. 

1. Chain 72 (You can do this with any foundation chain that is a multiple of 6)
2. 2 dc in 4th chain from hook. (This is the V-Stitch).
3. Skip 1, 2 dc in the next ch.
4. Repeat #3 until there are two chains left. 
5. Sk 1, dc in the last ch.  This completes your first row of V-Stitches bordered by 1 dc on either end of the row. 
6. Now you're ready to start your next row, so turn the work and ch 3 for your first dc of the new row.
7. Skip 2, 2 dc in the space between the two dc that make the V-Stitch from the row below. 
8. Repeat step 7 across the V-Stitches of the row below.
9. Skip 1, dc in last ch.
10. Repeat #6-#9 until the project is the length you desire.  Finish off and weave in ends.

I added fringe by using the 'book' method of measuring.  You can find a good tutorial for it here.

Finally, in case anyone wants to know the yarns & progression I used, I've outlined them both below.  

Yarn Colors:
3 skeins Tumbleweed
2 skeins Light Blue (cannot find the real name)
1.5 skeins of Russet
1 skein Wildfire
7/8 skein Prairie
1 skein Adirondack
7/8 skein Light Purple
1 skein Barrington
3/4 skein Khaki
2 skeins Barley
1/2 skein Tan (cannot find the real name)

Progression of Colors:

Rows 1-4 Tumbleweed & light blue
Row 5 Tumbleweed & Tumbleweed
Row 6-7 Tumbleweed & Russet
Row 8-10 Tumbleweed & Wildfire
Row 11-12 Wildfire & Russet
Row 13-14 Tumbleweed & Wildfire
Row 15-16 Tumbleweed & Russet
Row 17 Tumbleweed & Tumbleweed
Row 18 Tumbleweed & light blue
Row 19-20 light blue & Prairie
Row 21 light blue & Tumbleweed
Row 22-23 light blue & Adirondack
Row 24-26 light blue & light purple
Row 27-28 light purple & Barrington
Row 29-31 light purple & light blue
Row 32-34 light blue & Adirondack
Row 35-36 Adirondack & Prairie
Row 37-38 Prairie & Khaki
Row 39-40 Adirondack & Khaki
Row 41 Khaki & Tumbleweed
Row 42 Tumbleweed & Barley
Row 42-43 Barley & Russet
Row 44-46 Barley & Wildfire
Row 47-49 Wildfire & Russet
Row 50-51 Barely & Wildfire
Row 52-54 Barley & Russet
Row 55-58 Barley & light blue