Showing posts with label cooking. Show all posts

Wednesday, March 17, 2021

Bison Shepherd's Pie with Parsnip Mashed Potatoes

I wanted to make something warm and hearty and filling for St. Pat's this year.  But as I've also been working on losing some weight over the last few months, I decided to rethink the classic Shepherd's Pie by swapping out the beef for leaner ground bison, using lots of veggies, and lightening the classic mashed potatoes by making a batch of mashed parsnip potatoes.  


Bison Shepherd's Pie with Parsnip Mashed Potatoes
12-16 ounces ground bison
2 russet potatoes
2 parsnips
1 carrot, peeled and small diced
1 onion
1 clove of garlic
1/4 cup frozen corn
1/2 cup frozen peas
1 T flour
1 T tomato paste
1 T Worcestershire Sauce
1 - 1.5 cups beef broth
1/4 cup red wine
1-2 T butter
splash of milk
1/4 tsp thyme
1/4 tsp paprika
dash of garlic & onion powder
sprinkle of Parmesan or Cheddar cheese (optional)

Peel & large dice the potatoes.  Peel both the parsnips.  Large dice one, about the size of the diced potatoes, and small dice the other.  Peel & small dice the carrot & onion.  Mince the garlic.  

Place the large diced parsnip & potatoes in a pan of salted water, and bring to a boil. Cook until they are softened, about 15 minutes.  (A fork or the tip of a knife should pierce them easily.)  Drain, and return to the pan.  Add 1-2 Tablespoons of butter, a few good grinds of black pepper, and a splash of milk.  (I used unsweetened plain cashew milk.)  Mash, stir, mash some more, stir a bit more, till you have fluffy parsnip-potatoes.  Taste and salt as desired.

Meanwhile heat a skillet over medium high heat, and add a drizzle of olive oil.  Once the pan is hot, add the bison, and break apart.  Continue to cook until the meat is nicely browned and nearly cooked through.  

Add the diced onions, carrots, minced garlic, thyme, and paprika, and sauté until the vegetables are softened and have cooked down.  Grind in some black pepper.  Sprinkle with the flour, and stir to coat.  

Add the tomato paste, Worcestershire sauce, red wine, and 1 cup of the beef broth.  Stir to combine well.  Lower the heat and simmer until the sauce has thickened, about 10-15 minutes.  If there doesn't seem to be enough liquid, you can add more beef broth.  Stir in the thawed corn & peas.  Taste, and salt if necessary. (Commercial beef broth is often heavily salted, so once this has simmered and cooked down, you may not need any additional salt.) If needed, add a dash of garlic & onion powder.

Pour the meat and vegetable filling into a casserole dish or baking pan.  Top with the mashed parsnip potatoes.  I like to leave a little gap around the edge for the sauce to bubble up.  If desired, sprinkle the top lightly with cheese like Parmesan or Cheddar.

Bake in a 425 degree oven for 25 minutes, then broil for 2-3 minutes to brown the top. Or if you wish to make this ahead in the morning and bake it that night: allow the pie to cool for a few minutes, then cover and refrigerate.  When you're ready for dinner that night, preheat the oven to 425, and bake 30-35 minutes, then broil for a few minutes for a beautiful golden top.

Tuesday, March 17, 2020

Irish Bangers and Mash with Onion Gravy and Buttered Peas

Happy Saint Patrick's Day my friends!  While we are all in social isolation and cannot share a pint together tonight, I thought we could at least share recipes.  This year I found some Irish bangers at Aldi, and couldn't resist making up a little feast for DH & I while we're home together.

Irish Bangers and Mash with Onion Gravy with Buttered Peas

Bangers & Mash
1-2 packages bangers
2 lbs gold potatoes, peeled and large chopped
1/2 stick butter
Milk of choice (I used cashew milk)
1 tsp dry mustard powder

Onion Gravy
1 Tbsp butter
1 large onion, sliced
4 cups (1 tetrapak) vegetable broth
1 cups red wine or water

Peas
1 16oz bag frozen peas
3 Tbsp butter
2 tsp sugar
3 cloves fresh garlic, minced
Salt & pepper
1-2 Tbsp fresh mint, chopped

Directions
Preheat oven to 200 degrees, or whatever the lowest setting is.

Cook the sausages in a skillet over medium-low heat until nicely browned on all sides; transfer to an oven-safe dish or pan and move to the preheated oven to keep warm.

Place the potatoes into a saucepan with enough water to cover them, over medium-high heat, and boil  until tender, and easily pierced with a fork. About 15 minutes. Drain and return to the pan. Sprinkle over the dry mustard, salt & pepper.  Add in the 1/4 cup of butter, and a splash of milk.  Mash to your desired consistency.  I like mine with a few chunks. Set aside.

While the potatoes are cooking, start the onion gravy.  Melt 1 tablespoon butter in a large skillet over medium-high heat; add the onions and cook until they are translucent and starting to brown, about 8-10 minutes.

Reduce heat to medium, and pour in the vegetable broth and red wine.  Boil the mixture down gently, until it's about half the volume it was. It should take about 10-15 minutes.  Season with salt and pepper, and keep warm.

When the gravy is close to done, heat a medium skillet over medium heat.  Add the butter, peas, sugar and garlic.  Cook, stirring occasionally until the butter is melted, and the peas are heated all the way through.  About 5 minutes.  Stir in the mint, and remove from heat.  Season with salt & pepper.

To serve, place a large dollop of mashed potatoes on one side of the plate.  Place 1-2 sausages on top of the potatoes, and smother them both with a good ladle full of the onion gravy.  Place the peas on the other side of the plate.

Pretend that the vegetables on your plate make up for the whole stick of butter in your dinner.  Pour a favorite beverage, and enjoy with someone you love.  Keep each other close in your hearts & spirits right now, even if we're kept apart in person.
Slàinte!

Sunday, March 17, 2019

Mistress Jennie's Guinness Stew


During one of the numerous years I spent working in summer stock theatre, several of us technicians ganged up to buy groceries and cook together.  We weren't making enough money to each feed ourselves, but if we all chipped in and bought in bulk, we could afford to eat a bit better, both taste & health wise.  We jokingly called ourselves The Commune, much to the unhappiness of some of our housemates.  We would get together to look over the grocery store ads, and plan meals based on what was on sale.  Everyone in the group was responsible for something, planning the meals, doing dishes, setting table, cutting up veggies, and cooking the foods.  Over the course of the summer everyone ended up calling parents to get favorite family recipes for us to share.  Of course being theatre technicians, there was always alcohol around, and this led to our foray into the world of Guinness Stew.

Later that year, for Christmas, I made everyone in The Commune a binder full of all the recipes that we cooked together.  I've been told by a few of them that they still have their binders and have kept adding to them over the years.  This time I branched out even further than our settled recipe, by adding bacon, and serving it over mashed potatoes.


Mistress Jennie's Guinness Stew
Ingredients:
2-3 lbs stewing beef
5-6 slices thick-cut bacon, diced
1 large sweet onion, diced
3 parsnips, peeled & diced
4-5 carrots, peeled & diced
3-4 cloves of garlic, smashed & rough chopped
2 cans Guinness
4 cups beef broth
1/2 cup flour
2-4 T tomato paste
1-2 tsp dried thyme
fresh chopped parsley
1.5 lbs gold potatoes
4 T butter
splash of milk

Directions:
Start by rejoicing in the fact that St. Patrick's Day falls on a Sunday this year, meaning you have the time to cook a slow delicious stew.  Invite friends over.  Get turned down.  Realize this just means more stew for you.  Find a good apron.  Not your cutesy-pie apron; we're not frosting cupcakes here.  A real apron, that will get dirty, that you can wipe your hands on.

Assemble your ingredients.  Chop the bacon. 

Decide that a lovely afternoon cooking is a perfect excuse to put on some Irish folk music.  Look through your phone or iPod and discover that none of your Irish folk is on it.  Try Spotify, and realize that just like every other time you've tried it, it doesn't want to work for you.  Remember that you still own CDs and dig through them to find something like the Chieftans, only to recollect that it's 2019, and you don't own a CD player anymore.  Put the CD in the blu-ray player, and congratulate yourself on being bloody brilliant.  Pour yourself a Guinness to celebrate your awesomeness.

Return to the kitchen, and place half of the chopped bacon in the bottom of a stock pot, over medium-low heat.  Stir frequently to avoid burning.  Dry the first batch on paper towels, while you cook the second batch.  Dry the remainder of the cooked bacon on the paper towels. 

Turn up the music.  Enjoy how nicely that stout is going down.

Pour off most of the bacon grease into a bowl of measuring cup, leaving a bit in the bottom of the pan.


Dust your cubed stewing beef lightly in flour, shaking off the excess.  Working in batches, brown the beef cubes in the bacon fat.  You don't need it to be cooked through, just nicely browned.  Keep an eye on it, so you don't scorch the flour to the bottom of the pot.  For reference, my 2 lbs of beef was cooked in 6 batches.  Take your time.

When the CD ends, dig out the Cranberries.  They're Irish, it totally works.  Notice that you've finished your beer.  Before you can pour another, bump into the remainder of that bottle of red wine from Friday night, and work on finishing that off.  Waste not, want not.  I'm sure my Irish grandmother said that... 

As each batch of beef finishes browning, move to a bowl, and add more of the bacon fat if necessary to keep the bottom of the pot from getting dry.  Bits of browned fond on the bottom are great, but blackened carbon is not. 

Once all the beef has finished browning, check the bottom of the pot, and add either more bacon grease or cooking oil if you're out of bacon.  Add in the diced onions, and stir to coat.  Cook for a few minutes until the onions soften a bit.  Add in the carrots, parsnips, and garlic, and continue cooking for another 5-10 minutes. 

Upon finishing the browning, recollect just how maudlin music was in the 90's.  Your day is going too well to be maudlin.  Find something more upbeat.  Maybe something by the Irish Rovers.  Or the Dropkick Murphys.  Your call. 

Once the veggies have cooked down, pour a little of the Guinness in the pot to deglaze, and use a spoon to scrape up any bits of fond from the bottom of the pan.  Add the beef and cooked bacon back into the pot, along with the tomato paste, dried thyme, remaining Guinness and the beef stock.


Bring to a boil over high heat, then cover and reduce to a simmer.  Simmer for 2 hours, stirring every 5-10 minutes. 

Sit down for a bit, while the pot simmers.  Finish your wine while checking Facebook.  Be saddened by Facebook, and decide you are going to close yours.  ...until you run into an uplifting and inspiring video about a dog who saved someone's life.  Cry a little as you long to pet that dog.  That dog is everything.  Facebook must stay!  Finish your last sip of wine.  Realize you should have some water.  Find water.


When you have about 10 minutes left on the simmering clock, chop the potatoes, and place in another pot.  Pour in enough water to cover, and bring to a boil.  Boil 10-15 minutes, or until soft & tender when pierced with a fork.  Drain the potatoes, and return to the pot.  Add the butter, as well as salt & pepper to taste.  Get some of your anger about the English out by using your potato masher to squash them good.  Add milk (or preferred milk substitute) to achieve your desired consistency.  Cover, and keep warm. 

Once your two hours of simmering has elapsed, remove the cover and simmer another 30 minutes, to let the stew thicken.

Place a ring of mashed potatoes around the edges of your bowls.  Ladle the stew into the center, and top with the fresh chopped parsley. 


Make sure everyone has a beverage, and give a toast to those gathered round your table.  Enjoy every moment with those good people. 

May you have warm words on a cold evening, a full moon on a dark night, and a smooth road all the way to your door.  Slàinte!

Beannachtam na Feile Padraig!

Tuesday, August 21, 2018

Black Bean & Caramelized Onion Tacos


This recipe is easy, fast, and doesn't heat up the kitchen too much in the dead of summer.  Mostly chopping and stirring, with just a bit of time in a skillet.  Happy (and healthy) Taco Tuesday!

Black Bean & Caramelized Onion Tacos with Lime Marinated Zucchini

Ingredients:
1  can black beans
1  large sweet onion
6  flour tortillas
1 Tbsp taco seasoning (or a mix of chili powder, garlic powder, onion powder, smoked paprika, cumin, cilantro, & Mexican oregano)
1  lime
1  zucchini
1 Tbsp  light brown sugar
2 oz  aged sharp cheddar cheese (or vegan cheese substitute of choice)
¼ cup vegan sour cream substitute (or real sour cream if you want)
1 avocado
olive oil
salt & pepper

Directions:
Start by remembering that today is Monday, aka your husband's D&D night, and that you need to have made [i]& finished eating[/i] dinner by 6:00 pm, so he can go slay demigorgons or something.  Decide that vegetarian tacos are the way to go, and pull out the ingredients.  Realize that you're going to need some help to get this done on time, and put on some James Brown to help get you moving.  I recommend "Get Up Offa That Thing". 

Prep the ingredients:  Zest the lime, then slice in half.  Quarter the onion, then slice about 1/4" thick.  Halve the zucchini lengthwise; then cut into thin half moons.  Grate the aged cheddar cheese on the large side of a box grater.  Drain and rinse the black beans.

Start the filling:  In a nonstick skillet, heat a drizzle of olive oil on medium.  Add the sliced onion and season with salt & pepper.  Cook, stirring occasionally, 3-4 minutes.  Lower the heat to low, add the light brown sugar and cook for another 3-4 minutes, until golden and soft. 

While the onions caramelize, place the zucchini in a bowl with a light drizzle with olive oil, the juice of half the lime, and season lightly with salt & pepper.  Stir every few minutes, while getting on with the rest of your taco goodness.  You are the queen of multi-tasking. 

Realize that your James Brown song has ended, and ask Alexa to play you Brick House by the Commodores.  Heck yeah, you are kicking tonight's butt!

Go back to the skillet of onions, and add the beans, 1/2 cup of water, and the taco seasoning. Increase heat to medium-high, and cook, stirring occasionally and mashing the beans lightly with the back of a spoon, 7 to 9 minutes, or until thickened and the beans have slightly broken down. Turn off the heat; season with salt & pepper to taste.

While the beans cook, in a small bowl, combine the sour cream substitute, lime zest, the juice of the other lime half, 1 Tbsp of olive oil, and season with salt & pepper to taste. 

Wrap the tortillas in dampened paper towels and warm in the microwave for 15-30 seconds.  Or warm them in another skillet if you dislike microwaves.  But I for one, ain't got time for warming individual tortillas or washing extra pans!  [i]The crafts, the crafts are calling....[/i]  Finally, slice the avocado at the last minute, because you almost forgot about it.

Assemble the tacos: place a schmear of the lime cream on the bottom of each tortilla, then a scoop of the the black bean & onion filling, tuck the avocado slices along the sides, and top with the shredded aged cheddar. Serve with the marinated zucchini on the side.  Watch your meat-eating Midwestern husband happily destroy his veggie tacos, and know you are victorious.  Wish him luck in his D&D game, while not seeming like you are shoeing him out of the living room so you can crochet & Netflix with your puppy. 

Wednesday, December 6, 2017

White Chili with Chicken

 As we get closer to Christmas everything has gotten busier and busier, and I'm nearly pulling my hair out trying to do all the extra holiday things, on top of the added workload for my shop, and just generally trying to keep our home neat and bellies full.  Time for the crockpot!  I made this on Sunday night, and we've had the leftovers for dinner on Monday and Tuesday too.  I've made several versions of white chili over the years, and some have been good, and some have been bland.  This was AMAZING.  I altered the recipe I found on My Fitness Pal just a little, and am mostly posting it here so I can never lose it again.  Their version called for chicken breasts, which I find often dry out during a long crock-pot cook, so I switched to chicken thighs which stay nice and moist.  I also messed with their technique.  Just dumping everything in a crockpot in the morning is convenient, but doesn't allow for much depth of flavor that often comes from sautéing foods.  However, you can easily do the extra cooking steps the night before while cooking that night's dinner, then put the browned chicken & sautéed onions in the fridge till morning, then dump it all in and turn it on the next day.  Trust me, browning the chicken and onions makes all the difference.  Well that and the heat from the salsa verde! 


Crockpot White Chili with Chicken

Ingredients:
1 can great Northern Beans
1 can Cannellini Beans
2 lbs Boneless Skinless Chicken Thighs
1 jar of Salsa Verde
1 Yellow Onion, chopped
3 cloves Garlic, chopped
1 tsp Ground Cumin
1 tsp Chili Powder
6 cups Low-Sodium Chicken Stock

Toppings:
Fresh Lime Wedges
Sharp White Cheddar Cheese, shredded
Avocado, cubed
Green Onions, sliced
Cilantro, chopped
Sour Cream
Tortilla Chips

Chop the onion, and set aside.  Pour a layer of salsa verde into the crockpot, and add 1 of the cans of beans. 

In a large skillet, heat 1T olive oil over medium or medium-high heat.  Once hot, add the chicken thighs in batches, being sure to unfold the thighs so they brown evenly.  Do this in batches so as not to crowd the pan.  Remove the chicken and place in the crockpot.  (Note: the chicken just needs to be browned, but does not need to be cooked through.)

Leaving the browned bits and oil in the pan, pour in the diced onion.  Brown the onion until soft and lightly golden, and your whole house smells like heaven.  Pour the cooked onions on top of the chicken in the crockpot.

Add the remaining salsa verde, second can of beans, garlic, cumin, chili powder, and chicken broth.  Turn the crockpot to low and cook for 6 hours.  (I suggest taking this time to get some crafting done, because hey, dinner is taken care of!)

Remove the chicken from the crockpot, and lightly shred with a fork.  It will already be falling apart.  Place the shredded chicken back into the pot, and stir well. 

Serve with any (or all!) of the toppings you like.  I greatly enjoyed aged white cheddar, avocado, cilantro, and lime wedges.

Wednesday, October 12, 2016

Vanilla Extract

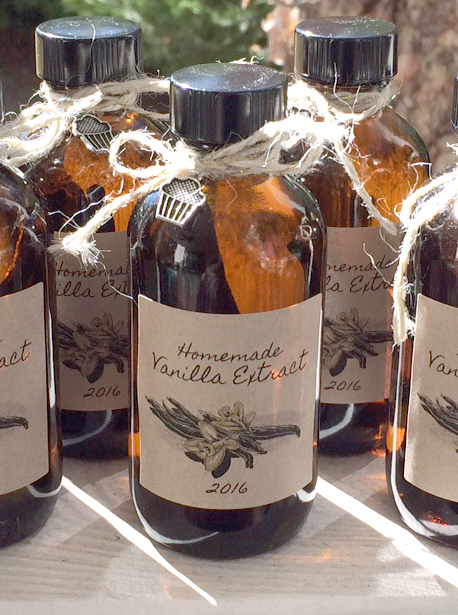
After starting our Limoncello, we also set up some bottles of vanilla extract to steep.  This is a super fast and easy gift, that nearly everyone can use.  Want to make your own?


You will need:
10-15 Vanilla beans of good quality
40 ounces inexpensive vodka
10 Small glass bottles

Wash your bottles with warm soapy water, and rinse well.  Allow to dry.

Once your bottles have dried, you will need to cut up your vanilla beans.  I cut mine in halves, but you can measure the length of your beans agains the size of your particular bottles.  We used one and a half beans for each bottle of extract.

Add your bean pieces to the bottles, and then use a funnel to fill each bottle with vodka.  Wipe down the bottles to make sure they are clean before labeling.

I used the same 2" square kraft paper labels from Avery, and a piece of free clipart for vanilla beans.  Since my printer only prints in black and white, I went back with a beige marker and gave some definition to the flowers.  Once the labels were on the bottles, they still looked a little plain to me, so I added a twine bow, along with a pewter charm of a cupcake to each one.


Note on supplies: We purchased our vanilla beans from My Spice Sage.  I've ordered spices from them in the past for canning, and the quality is always great.  (Plus on each order, they let you pick out a 1 ounce packed of spice to try for free, from an extensive list!)  Like with the Limoncello, I ordered my 4 oz amber Boston Round bottles from Specialty Bottle in Nashville.  They came exceptionally well packed, and shipped right away.  While it might be tempting to go with the clear glass, using brown bottles will actually help protect the extract's flavor from being destroyed by light.

Making Limoncello

I recently got together with my friend Amber, for our annual weekend of canning huge batches of Christmas presents.  While we did our usual canning of jams and mustards, we also did some homemade vanilla extract, and a double batch of limoncello.  I used to make liqueurs for holiday gifts every year, but somehow in the last few years I got out of the habit.  Clearly it's time to rectify that.


Here's how to make some of the limoncello for yourself.

To make 5 375ml (12.5) bottles, you'll need:
10 large, preferably organic lemons
1 750ml bottle of vodka
cheese cloth
2.5 cups water
3 cups sugar

Note on vodka:  Find a decent, drinkable vodka that you would use to mix cocktails with at home.  It doesn't need to be top shelf, but avoid giant plastic jugs that could double as paint thinner.  For this batch we used Smirnoff and Absolut.

Because the lemons will probably have a wax coating on them, you'll need to carefully clean that off, without destroying the essential oils in the peels that give the liqueur its flavor.  There are a few ways to clean lemons, including running boiling water over them, spraying them with a vinegar & water solution, or microwaving them for short burst of time, all of which help loosen the wax they are coated with.  Check out all the methods here on Wikihow.  We went with the microwave method.

Work with just a few lemons at a time, microwaving 3 for 10-20 seconds, on a microwave safe plate.  Take the warm lemons out, and scrub them with a vegetable scrub brush under cool running water. Give them a final rinse and they dry them with a clean tea towel or paper towels, before moving on to the rest of the lemons.

Once you have all your lemons de-waxed, it's time to peel them.  Use a vegetable peeler to remove the bright yellow peel, avoiding the white pith, which is very bitter.  Try to remove the peel in large pieces, rather than lots of tiny ones.  This will help when you strain the peels out, resulting in a clear liquid, rather than a dusty, murky one.

Divide your peels between 2 large, clean, quart jars.  (If doubling this recipe you can do it with 3 jars.)  Pour the vodka over the peels, and place in a cool, dark place for 10-12 days.  After just a few hours, if you swirl the jar, you can see that the alcohol has already turned a bright golden yellow.


Once the 10-12 days have passed, it's time to make the simple syrup that will sweeten the liqueur.  Place the sugar and water into a heavy bottomed sauce pan, and bring to a boil, stirring frequently to dissolve the sugar.  Once the sugar is fully dissolved and the liquid has come to a boil, turn off the heat and allow the mixture to cool for 30 mins to an hour.  Once it has cooled, line a colander with cheesecloth and place over a large bowl.  Pour the lemon steeped vodka through the cheese cloth, making sure to strain out all the bits of peel.  Discard the peels.  Add the lemon vodka to the syrup, stirring gently but thoroughly.


Pour your liqueur into clean bottles, and cork.  Wipe down the bottles to make sure there's no sugary liquid on them, then allow to dry before labeling.  For my batch, I used 2" square kraft paper labels from Avery.  You can design your labels with their online software and print them at home.  I added some pretty lemon branch graphics from the Graphics Fairy.  Since I only have a black and white printer, I used a yellow marker to add a hint of color to the lemons on the branches.  Once the labels were on the bottles looked a little plain to me, so I added a twine bow, along with a pewter charm of a lemon slice to each bottle.


Note on packaging your sunshine elixir: We used 375 ml woozy round glass bottles with T top corks, from Specialty Bottle in Nashville.  A single batch of this recipe will fill 5 of these bottles, with a scant few ounces left over for you to sample. (A little over 1875 ml, or 64 ounces.) Of course you can also use larger or smaller bottles for your limoncello, and little simple math will help you determine how many you need.


Wednesday, October 28, 2015

Autumn Canning Adventures

I promised that this blog would include all my crafty endeavors, and yet I seem to have mostly posted just my jewelry projects lately.  Though I've been making lots of jewelry in preparation for the holidays, I took 2 days off last week to spend some time canning with my good friend Amber.  I love Amber for a lot of reasons, but our relationship is probably best summed up by the following card.


And while most of our time together involves a few drinks and hours of snarky conversation, we also always manage to get a whole lot of work done at the same time.  This past visit was no exception.  We made five canning recipes; 2 which were old favorites and 3 that were new to us.  I will admit right now that I didn't take any fancy staged photos of ingredients or the cooking process.  After all, I am not a food blogger, but rather a craft blogger.  I will however provide sources or links to all the recipes.


The first project was  a batch of Red Wine Jelly from the Ball Complete Book of Home Preserving.  I really can't say enough good things about this book, and the recipes in it.  It contains 400 recipes, all of which sound delicious, and all of which have been tested repeatedly, so you know they work every time.  (One of the reasons that I love this particular recipe is that it calls for exactly one bottle of wine, while many others call for 1/2 cup from a second bottle.)  I used my current favorite wine, Apothic Dark, which has blackberry, blueberry, coffee and dark chocolate notes in it.  Remember that the flavor will become more concentrated and cerntainly much sweeter with the addition of sugar.  I've also done this with a Norton wine from local winery, Reid's Livery from Alvaton, KY, which might be my favorite jelly ever due to the strong and complex flavors of the wine.  


Our next recipe was Dilly Beans, from the blog Food In Jars.  These were requested by Amber's brothers.  We made them 2 years ago, and apparently the boys have been asking for more ever since then.  They are a great way to use up lots of green beans from your garden, and produce a bright and intense dill and garlic pickle.  Amber brought some of the beautiful green Heritage Collection Jars, and the bright green beans look extra pretty in them.


While we were working on the Dilly Beans, we set the basil to steep for a batch of Basil Jelly, from the blog Sweet Domesticity.  If you check out the recipe you will see that mine did not come out the bright green color that Maria's did.  As noted in the comments section of her post, it seems that the variety of basil you use, as well as how you prepare it, can vary the color.  As the recipe has a strong lemon flavor to it, I love the golden honey color of my finished jelly.  We procured our basil from Kroger, as my tiny patio garden didn't produce enough basil for this recipe.  Hopefully I'll have a bigger garden to pick from next summer. 

I should also note that the photos from Maria's blog looked to me like 4 oz jars, but the recipe states that it makes 5 half-pints (8 oz. jars).  Since I was a bit confused, I posted a question about it in the comments section, and Maria got right back to me to let me with an answer!  The jars in her photos were actually wide mouth 8 oz jars, that just happen to look like the 4 oz variety when there is no other frame of reference in the photos.  Thanks for your help Maria!  


The jelly is fantastic.  Bright from the lemon and a beautiful herby basil flavor that I adored.  Our batch came out just shy of 5 half-pints, so I kept the open jar for myself, and have enjoyed it on toast, as well as on some glazed salmon I made on Monday.  I was able to use up some of the leftover garlic, onions, and green beans in the Vegetable Risotto as well.  I will definitely be making this jelly again next year.


After lunch Amber and I did a batch of Pear & Ginger Jam, from the blog Savvy Eats.  According to the post, this recipe was adapted from the book Canning for a New Generation, so I've included a link to the book on Amazon as well.  This recipe made a thick and chunky jam, that was sweet from the pears, but has a nice kick of heat from the ginger.


Our final recipe during this crazy day of canning was for Sweet Onion & Maple Conserve.  The recipe comes from a single issue magazine I bought last summer called Better Homes and Gardens Canning+Preserving+Freezing+Drying.  Since it would be very hard to find I've linked to the recipe for it that I shared in the Harry Potter Craftalong over on Craftster.  This stuff is utterly fantastic, and I want to put it on everything.  The onions and maple syrup are very sweet, but are tempered by the butter and fresh thyme, which came from my herb garden.  The recipe states that it will make 5 4oz. jars, but our batch would have filled 6.  We filled and processed 5 jars, one of which apparently wasn't closed well enough and came open during canning, spewing onions all over my canner.  When we realized that we still had more of the golden goodness, we filled an extra jar to be used right away.  That jar is already gone.  How you ask?  Burgers, with aged sharp cheddar, bacon, and this conserve on toasted sourdough.  I regret nothing.


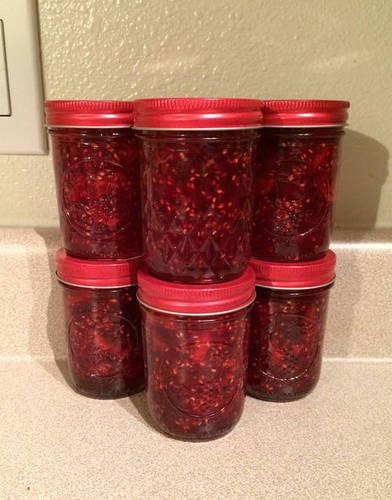
After all that canning, I somehow still was up for making one last batch of jam on Monday.  Since I had some leftover liquid pectin, and raspberries were on sale over the weekend, and my New England heart believes cranberries are a year round food, I did a batch of Cran Raspberry Preserves.  The recipe is also from the Ball Complete Book of Home Preserving.  This jam tastes like Thanksgiving in a jar.  The tart cranberries are softened by apples, honey, and the bright sweetness of raspberries.  I love traditional raspberry jam, but I don't like too many seeds.  (I'm complicated.)  I loved the consistency of these preserves.  Spreadable, with some chunks, bright red, and just the right amount of seeds.  Just for fun I used the red lids and bands from Ball that I found in Kroger.  They also had purple in store, and blue and green are available online, either from Ball or Amazon.

For now, I'm taking a bit of a break from canning to get back to crafting for my shop, and hopefully writing some more here, but I'm sure I'll be making a few more recipes for holiday gifts.  My mom has already asked for some of the Cranberry Mustard that I made for the last two years, and since clementines always start appearing in stores at this time of year, I'm contemplating Mandarin Oranges in Ginger Syrup.