Showing posts with label scarf. Show all posts

Tuesday, February 26, 2019

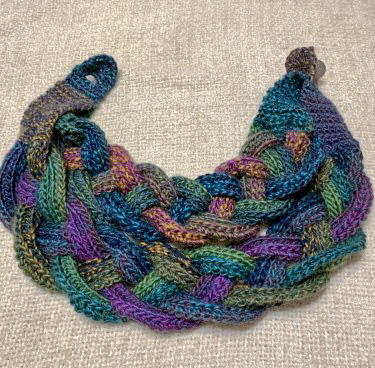
Double Layer Braided Cowl


This cowl was made for LeapFeetFirst in the Asheville Adventure Swap.  The pattern is the Double Layer Braided Cowl, and is available for free. The yarn is Nako Artist in colorway purple-green multi.  I picked it up on sale from Webs a while back, and had been waiting for the perfect project to use it for.


Sunday, December 30, 2018

Wild Birds of Paradise Silk Scarf


This was a really quick little project.  I started it on Christmas Day, while waiting for all the rest of the family to arrive at my Mother in Law's house, and finished it last night.  The pattern is the Naturally Southern Scarf, and the yarn is Darn Good Yarn's DK weight silk, in Wild Birds of Paradise.  I had received a skein of it in their yarn subscription box, and loved it so much that I knew I wanted to make something larger with it.  When I checked my account, I had enough points saved up to get a $25 gift card, plus the lovely curiousfae sent me a $10 credit from them that she wasn't able to use, so I paid next to nothing for it.  I love the deep raspberry, teal and turquoise, and how they are offset by the bright cheerful yellow.  Also the silks used in their yarns are waste that would otherwise end up in a landfill, but DGY rescues them, and then provides fair wages to women in India & Nepal, allowing them to work from home and support their families. 

Saturday, December 22, 2018

13th Doctor's New Year's Scarf

Like many Doctor Who fans, as soon as I saw the promo shots of 13th Doctor Jodie Whittaker in the upcoming New Year's special, I fell in love with her rainbow scarf.  Not long after the promo pictures were released, someone of course came up with a crochet pattern for one. 


I had many of the colors needed in Caron Simply Soft, so after a quick trip to pick up the rest, I sat down last weekend to make myself one!  The pattern was designed by Mel Harrison over at Mahogany Turtle and is free on her blog.   For a full list of every one of the 17 colors of yarn I used, check my Ravelry page.


It stitches up really fast, and is easy to adapt, based on what you have on hand.  I absolutely love how it came out, but of course, as soon as it was done, I became aware of a friend who has a greater need for a rainbow in their life right now, so I just packed it up and shipped it off to him.  It'll arrive a few days after Christmas, but he'll have it in time for New Year's, and hopefully it will keep him warm and protected during the cold winter months in NYC.   Josh has always been a bit of a Guardian Angel to his friends and family, stepping up whenever someone has needed help.  He's the ultimate Gryffindor, chivalrous and selfless in his efforts to help anyone who needs it, always ready with a kind word when you need it most.  I hope this little rainbow will keep him safe as he goes about changing the world for the better.  I guess I'll just have to make myself another one as soon as I get back from Christmas with my in-laws.


Tuesday, February 6, 2018

Briar Rose Scarf

I recently participated in the Fairytale Swap on Craftster.  My partner itsmereba mentioned that Briar Rose was one of her favorite fairy tales, and I got the idea of creating a scarf reminiscent of the rose vines that surround the castle in the story.  I wanted it to be something she could wear in the mild winter of TX, but that could also be displayed decoratively like a garland in the summer.  I searched around, certain that someone had created a pattern like I was dreaming of, and found the Belle Fleur Scarf by Michele Wilcox/Stitch Nation.  The roses are made from Bernat Satin in Bordeaux and Yarn Bee Soft Secrets in Rosebud, and the vine and leaves are Lion Brand Heartland in Joshua Tree.


I will warn that while the picture makes the scarf look simple, it was actually much more fiddly than I was expecting.  The vine and leaves are created with a foundation chain, then slip stitching all the way back down, making leaves along the way, then slip stitched again back up the other side, again making more leaves on the way.  While none of it was difficult per se, I find slip stitching in such a skinny area a bit tedious, especially when the yarn wants to turn around on itself.  The roses were just plain crazy.  I read the pattern, and tried to follow it, but it didn't make sense at all, so I checked other users comments on Ravelry, and discovered that most people didn't understand what the pattern wanted you to do.  After a lot of frogging and retrying, I did finally figure out the pattern as it was written, but I wasn't very impressed with the finished rose.  It wasn't as big and full as I'd like, so I dug around on Youtube until I found a tutorial I liked by simplydaisy, then altered her method a bit to make the roses just a pinch bigger by adding 6 more petals made from triple crochet stitches.  I've included my rose pattern below.

Rose Pattern (US Terms):
Leaving a long tail (about 10”), chain 54.

Row 1: Sc in 2nd ch from hook. Sc all the way across. (52 sc)

Row 2: Ch 1, turn. Skip next ch space, and trc into 3rd st. 4 trc in same space. (This makes 1 triple crochet shell.) Skip next ch space, sc in next space, skip next chain space, 5 trc in next space. Repeat 4 more times for a total of 6 triple crochet shells.

Skip next ch space, sl st in next space, 5 dc, sl st. (This is 1 double crochet shell.) Repeat double crochet shell 5 more times for a total of 6 dc shells.

5 hdc, sl st. (This is 1 half double crochet shell.) Repeat half double crochet shell 4 more times, for a total of 5 hdc shells.

5 sc, sl st. (This is 1 single crochet shell.) Repeat 2 more times, for a total of 3 sc shells. After slip stitching in last space, fasten off, and leave another long tail.

Working from the sc shell end, start twisting the work into a flower spiral. Use the long tails of thread to sew the petals in place.