
Saturday, November 24, 2018
Autumn Kaleidoscope Shawl
I have been trying to stash bust in an effort to keep my studio neat and tidy, and to avoid accumulating too much yarn. The pattern is the Kaleidoscope Shawl, and it's free on Red Heart's website. When I saw this simple pattern, I knew it would be great with the skeins of Red Heart Boutique Unforgettable that I bought on clearance a few months back. It's basically 5 rows of granny, then 5 rows of 'every other' double crochet net, with a picot shell border. It works up really quick and easy, and I love how it shows off the colors in the yarn. I think it's going to my lovely sister in law.


Friday, November 2, 2018
Haunted Mansion Grapghghan

I tackled a great big scary new realm in the world of crochet. (Well, scary for me.) I created my first graphghan! It is a gift for a friend who just got married. Neither her, nor her husband, wanted to keep their own names when they married, but neither liked the other's last name either, so the decided to pick a new one together. They are both Disney fanatics, and love the Haunted Mansion, so they chose to use the name of the fictional owner, Mr. Gracey. Clearly they needed something both cozy, and a little bit macabre for their very own Gracey home, so I chose to use a portion of the wallpaper in the Haunted Mansion as my inspiration.


The body of the graphghan was done with Red Heart Super Saver in black and orchid. It took 2 Jumbo skeins of orchid and 1 Jumbo skein of black. I had just a bit of each leftover. Rather than go out and buy more of it for the border, I used some Vanna's Choice in black to do that part. I don't think you can tell that they are two different black acrylics in it. They eyes are Caron Simply Soft in Cream that I had in my stash.

I'm thrilled with how it came out, but I'm also quite glad to see the back of the project! It took me a lot longer than I thought it would, about 8 weeks. I haven't measured it, but it is about 42" wide x 50" tall.

Monday, October 1, 2018
Strawberry Hooker's Helper Necklace
My dear friend, the uber-talented Embroiderer Extraordinaire kittykill is learning to crochet. Since I was already crafting her some strawberry goodies, I couldn't help but want to send her some fun tools to use as she learns to hook, so I whipped up a Hooker's Helper necklace for her. The pendant at the bottom is a thread/yarn cutter. The charms are stitch markers that can be removed to use in a project, and stored back on the necklace when done. There are 4 little enamel strawberries, 2 green enamel stars, and 4 beads to help her keep track of her work.


Sunday, September 30, 2018
Strawberry Blossom Bracelet
After making the strawberry kitchen items, I moved away from crochet. I knew I wanted to find a way to use some of the beautiful lampwork glass strawberry beads in my stash. As I searched the web for inspiration pictures of strawberries, I decided I'd like to add some blossoms too, so I found some lucite flowers and bright green lucite leaves.

The bracelet chain is sterling, and the findings are sterling-filled. The beads are a mix of handmade lampwork berries, Czech glass, and Swarovski crystal. The whole piece was a joy to make.


Saturday, September 29, 2018
Evil Eye Rearview Mirror Charm
Put this together for dear kittykill, as an extra in a swap recently. A rear view mirror charm to protect her in her travels. I've had the big square glass pendant for ages, just waiting for the right project. The tassel came with the beaded eye band. I think I found that on clearance somewhere a few months ago. The glass eye bead was also stash.


Strawberry Kitchen Accessories
I recently organized a "Life is Berry Sweet" Swap, themed around cheerful little strawberries. I had the good fortune to be crafting for the lovely kittykill. I know she has a red & yellow kitchen, and an overall 'Granny-Chic' design concept, so I decided to make her some granny inspired goodies.
I fell in love with an adorable potholder I saw on Ravelry, but the pattern was only available in a book that's out of print, so I decided to try to figure it out myself.

I started by looking on Youtube for a video showing how to make a mitered corner square. For mine I started with a chain of 52, then followed the video instructions, alternating colors every 2 rows. I made two of these squares, and then used the red yarn to hook them together along the edges to make it two layers thick. I added a basic shell border in red, along with a loop at the top, and found a pattern for a strawberry applique.

I liked the alternating stripes of white and green potholder so much that even though I planned to make some strawberry dishcloths (below), I decided to make a striped one too. I was partially afraid that kittykill might want to display her goodies, rather than use them, so I figured a spare dishcloth to actually use wouldn't go amiss. The pattern is one of my all time favorites, as it makes nice sturdy, but still pretty, dishcloths. It's available as a free Ravelry download. Fire Blossom Dishcloth.

I knew I would be making at least a few of these Granny Strawberry Dishcloths, before I started on the potholder. I made them earlier this summer for some friends, and just loved how they came out. The Granny triangle is a quick & easy pattern, but the stems can be a little confusing as you read the written pattern. I just used a pen & paper to sketch out what the directions were saying badly, and then winged it.

Finally I wanted to add a few more bits and bobs to the kitchen set. I thought a set of coasters might be fun, so I tried starting with a set based on a variation on a granny square, but I disliked how it was coming out. It didn't seem like it would make a good size coaster, and the bubble stitch used made it too bumpy to hold a drink on top of.

So I ended up taking the coaster I started and turned it into a trivet instead. I figured with a larger item like a pan, the slightly lumpy center wouldn't be as much of a problem as it would with a narrower glass. I just added a few granny rows and a border with some picot stitches in the corners.

Since the square coaster idea didn't work, I decided to try a round variation on the Granny theme, and went with this pattern, intended for Christmas ornaments, and added a round of slip stitching on the backside, to give it a slightly raised edge.

I fell in love with an adorable potholder I saw on Ravelry, but the pattern was only available in a book that's out of print, so I decided to try to figure it out myself.
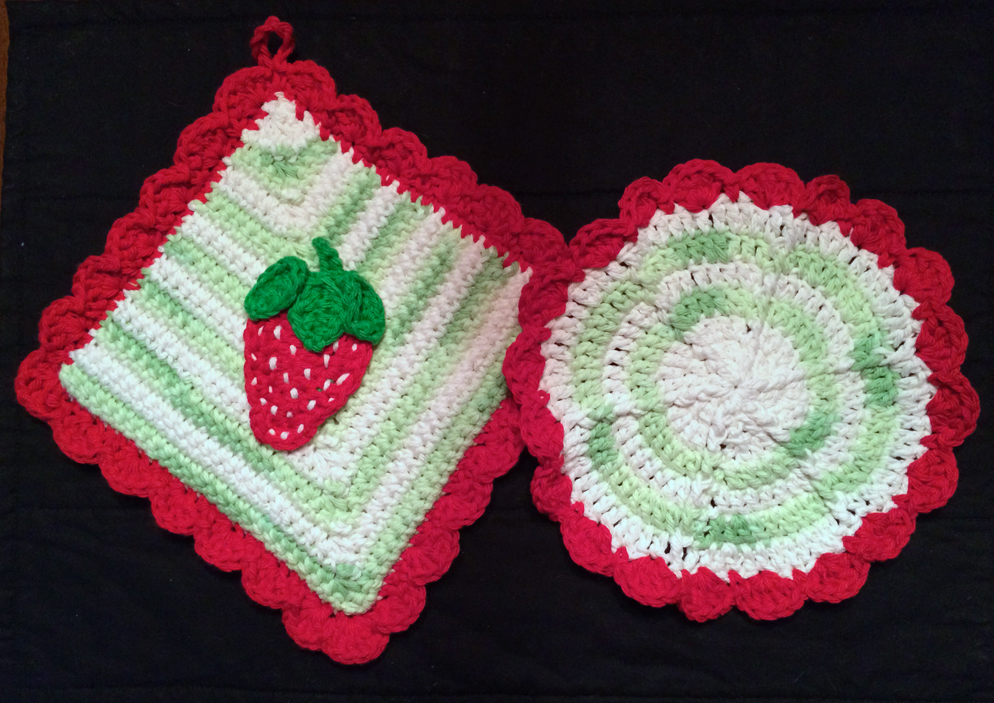
I started by looking on Youtube for a video showing how to make a mitered corner square. For mine I started with a chain of 52, then followed the video instructions, alternating colors every 2 rows. I made two of these squares, and then used the red yarn to hook them together along the edges to make it two layers thick. I added a basic shell border in red, along with a loop at the top, and found a pattern for a strawberry applique.

I liked the alternating stripes of white and green potholder so much that even though I planned to make some strawberry dishcloths (below), I decided to make a striped one too. I was partially afraid that kittykill might want to display her goodies, rather than use them, so I figured a spare dishcloth to actually use wouldn't go amiss. The pattern is one of my all time favorites, as it makes nice sturdy, but still pretty, dishcloths. It's available as a free Ravelry download. Fire Blossom Dishcloth.

I knew I would be making at least a few of these Granny Strawberry Dishcloths, before I started on the potholder. I made them earlier this summer for some friends, and just loved how they came out. The Granny triangle is a quick & easy pattern, but the stems can be a little confusing as you read the written pattern. I just used a pen & paper to sketch out what the directions were saying badly, and then winged it.

Finally I wanted to add a few more bits and bobs to the kitchen set. I thought a set of coasters might be fun, so I tried starting with a set based on a variation on a granny square, but I disliked how it was coming out. It didn't seem like it would make a good size coaster, and the bubble stitch used made it too bumpy to hold a drink on top of.

So I ended up taking the coaster I started and turned it into a trivet instead. I figured with a larger item like a pan, the slightly lumpy center wouldn't be as much of a problem as it would with a narrower glass. I just added a few granny rows and a border with some picot stitches in the corners.

Since the square coaster idea didn't work, I decided to try a round variation on the Granny theme, and went with this pattern, intended for Christmas ornaments, and added a round of slip stitching on the backside, to give it a slightly raised edge.

Tuesday, August 21, 2018
Black Bean & Caramelized Onion Tacos

This recipe is easy, fast, and doesn't heat up the kitchen too much in the dead of summer. Mostly chopping and stirring, with just a bit of time in a skillet. Happy (and healthy) Taco Tuesday!
Black Bean & Caramelized Onion Tacos with Lime Marinated Zucchini
Ingredients:
1 can black beans
1 large sweet onion
6 flour tortillas
1 Tbsp taco seasoning (or a mix of chili powder, garlic powder, onion powder, smoked paprika, cumin, cilantro, & Mexican oregano)
1 lime
1 zucchini
1 Tbsp light brown sugar
2 oz aged sharp cheddar cheese (or vegan cheese substitute of choice)
¼ cup vegan sour cream substitute (or real sour cream if you want)
1 avocado
olive oil
salt & pepper
Directions:
Start by remembering that today is Monday, aka your husband's D&D night, and that you need to have made [i]& finished eating[/i] dinner by 6:00 pm, so he can go slay demigorgons or something. Decide that vegetarian tacos are the way to go, and pull out the ingredients. Realize that you're going to need some help to get this done on time, and put on some James Brown to help get you moving. I recommend "Get Up Offa That Thing".
Prep the ingredients: Zest the lime, then slice in half. Quarter the onion, then slice about 1/4" thick. Halve the zucchini lengthwise; then cut into thin half moons. Grate the aged cheddar cheese on the large side of a box grater. Drain and rinse the black beans.
Start the filling: In a nonstick skillet, heat a drizzle of olive oil on medium. Add the sliced onion and season with salt & pepper. Cook, stirring occasionally, 3-4 minutes. Lower the heat to low, add the light brown sugar and cook for another 3-4 minutes, until golden and soft.
While the onions caramelize, place the zucchini in a bowl with a light drizzle with olive oil, the juice of half the lime, and season lightly with salt & pepper. Stir every few minutes, while getting on with the rest of your taco goodness. You are the queen of multi-tasking.
Realize that your James Brown song has ended, and ask Alexa to play you Brick House by the Commodores. Heck yeah, you are kicking tonight's butt!
Go back to the skillet of onions, and add the beans, 1/2 cup of water, and the taco seasoning. Increase heat to medium-high, and cook, stirring occasionally and mashing the beans lightly with the back of a spoon, 7 to 9 minutes, or until thickened and the beans have slightly broken down. Turn off the heat; season with salt & pepper to taste.
While the beans cook, in a small bowl, combine the sour cream substitute, lime zest, the juice of the other lime half, 1 Tbsp of olive oil, and season with salt & pepper to taste.
Wrap the tortillas in dampened paper towels and warm in the microwave for 15-30 seconds. Or warm them in another skillet if you dislike microwaves. But I for one, ain't got time for warming individual tortillas or washing extra pans! [i]The crafts, the crafts are calling....[/i] Finally, slice the avocado at the last minute, because you almost forgot about it.
Assemble the tacos: place a schmear of the lime cream on the bottom of each tortilla, then a scoop of the the black bean & onion filling, tuck the avocado slices along the sides, and top with the shredded aged cheddar. Serve with the marinated zucchini on the side. Watch your meat-eating Midwestern husband happily destroy his veggie tacos, and know you are victorious. Wish him luck in his D&D game, while not seeming like you are shoeing him out of the living room so you can crochet & Netflix with your puppy.
Subscribe to:
Posts (Atom)