Sunday, March 15, 2020

Citrus Olive Oil Cake

I was so excited to have the lovely pottermouth and her daughter stay with us last night.  In honor of the occasion I decided to make a Mediterranean diet-friendly olive oil cake to celebrate.  This recipe was adapted from a recipe by Katiebird Bakes.  Here's my version.

For the cake:
1 c whole wheat pastry flour
1 1/2 c all-purpose flour
1 1/2 tsp baking powder
1/2 tsp baking soda
1/2 tsp salt
3/4 c granulated sugar
3/4 of the zest from one large grapefruit
2 large eggs
1 cup yogurt (I used non-dairy coconut yogurt)
1/2 cup olive oil
1/2 teaspoon vanilla extract
1 large grapefruit
1 orange
1-2 tangerines

Glaze:
1/3 cup fresh citrus juice
1 tablespoon granulated sugar

Icing:
2 tablespoons glaze (see below)
1 cup powdered (confectioner's) sugar
1/4 of the zest from the grapefruit
Pinch of salt
Sliced almonds for garnish

Preheat oven to 350 degrees, and grease a bundt pan well with cooking spray, and sprinkle in some granulated sugar.  Set aside.

Zest & juice your grapefruit.  Juice your orange & tangerines, until you have close to 1 cup or mixed citrus juice.

In a medium bowl, whisk together flour, baking powder, baking soda, & salt; set aside.

In a large bowl, rub the sugar and grapefruit zest together with your fingers until the mixture is fragrant. 

Add the eggs, yogurt, olive oil, vanilla, and 1/2 cup of citrus juice to the sugar, and whisk it all together until well combined.

Add the flour mixture into the wet mixture, and stir until just mixed.

Pour the batter into your bundt pan, and bake for 35-40 minutes, until the cake is golden around the edges, and cooked through.

While it bakes, prepare the the glaze and icing:

Glaze: Place 1/3 cup citrus juice and 1 tbsp granulated sugar in a microwave-safe measuring cup or bowl.  Microwave on high until bubbling and sugar has melted, about 1 minute.  Whisk together and set aside to let cool; reserve 2 tbsp of the glaze for the icing.

Icing: whisk together 2 tbsp of the prepared glaze, the powdered sugar, remaining grapefruit zest, and salt in a small bowl until smooth and pourable.  Set aside.

When the cake comes out of the oven, immediately poke holes all over the surface of the cake with a wooden skewer or toothpick.  Pour the glaze over the hot cake slowly, allowing it to soak in.

Let the glaze soak into the cake for 15 minutes, then turn the cake out onto a wire rack.

Once the cake is released and cooled, pour the icing over top, and garnish with slivered almonds.

Wednesday, March 4, 2020

D&D Convention Badge Holders

These badge holders have been on my To Make list for months now.  While browsing through Pinterest I saw the pattern come up from Kidgiddy on Etsy.  She designed them for quilting conventions, but I knew right away I had to make some for my husband to go to Gary Con, a Dungeons & Dragons Convention, this year.  He went last year and loved it, and even texted me from the event to say he definitely wanted to attend again. 
 
The inside features 2 zippered pockets.  I dug through my stash of mixed colored zippers and picked two that worked with the dungeon map and stone castle fabrics, all of which came from Spoonflower.  I figured the different colored zippers might also help when trying to remember which pocket you tucked the item you're looking for.
 
The back features a cell phone pocket, with room for a pen or pencil.  The whole thing is held closed with a pearl snap.
 
Since I was worried about trying out a new pattern with the specially ordered fabric, I made a practice one, for a friend of Jim's who will be coming over from Ireland for another D&D Con later in the year.
 
I was so thrilled to have finished these well in advance of the con at the end of March.  No last minute all-nighters!  Sadly Gary Con, like every other event right now, has just been cancelled.  So they will have to wait till Covid is under control or there is a vaccine in place for Jim to get to use them.

Monday, March 2, 2020

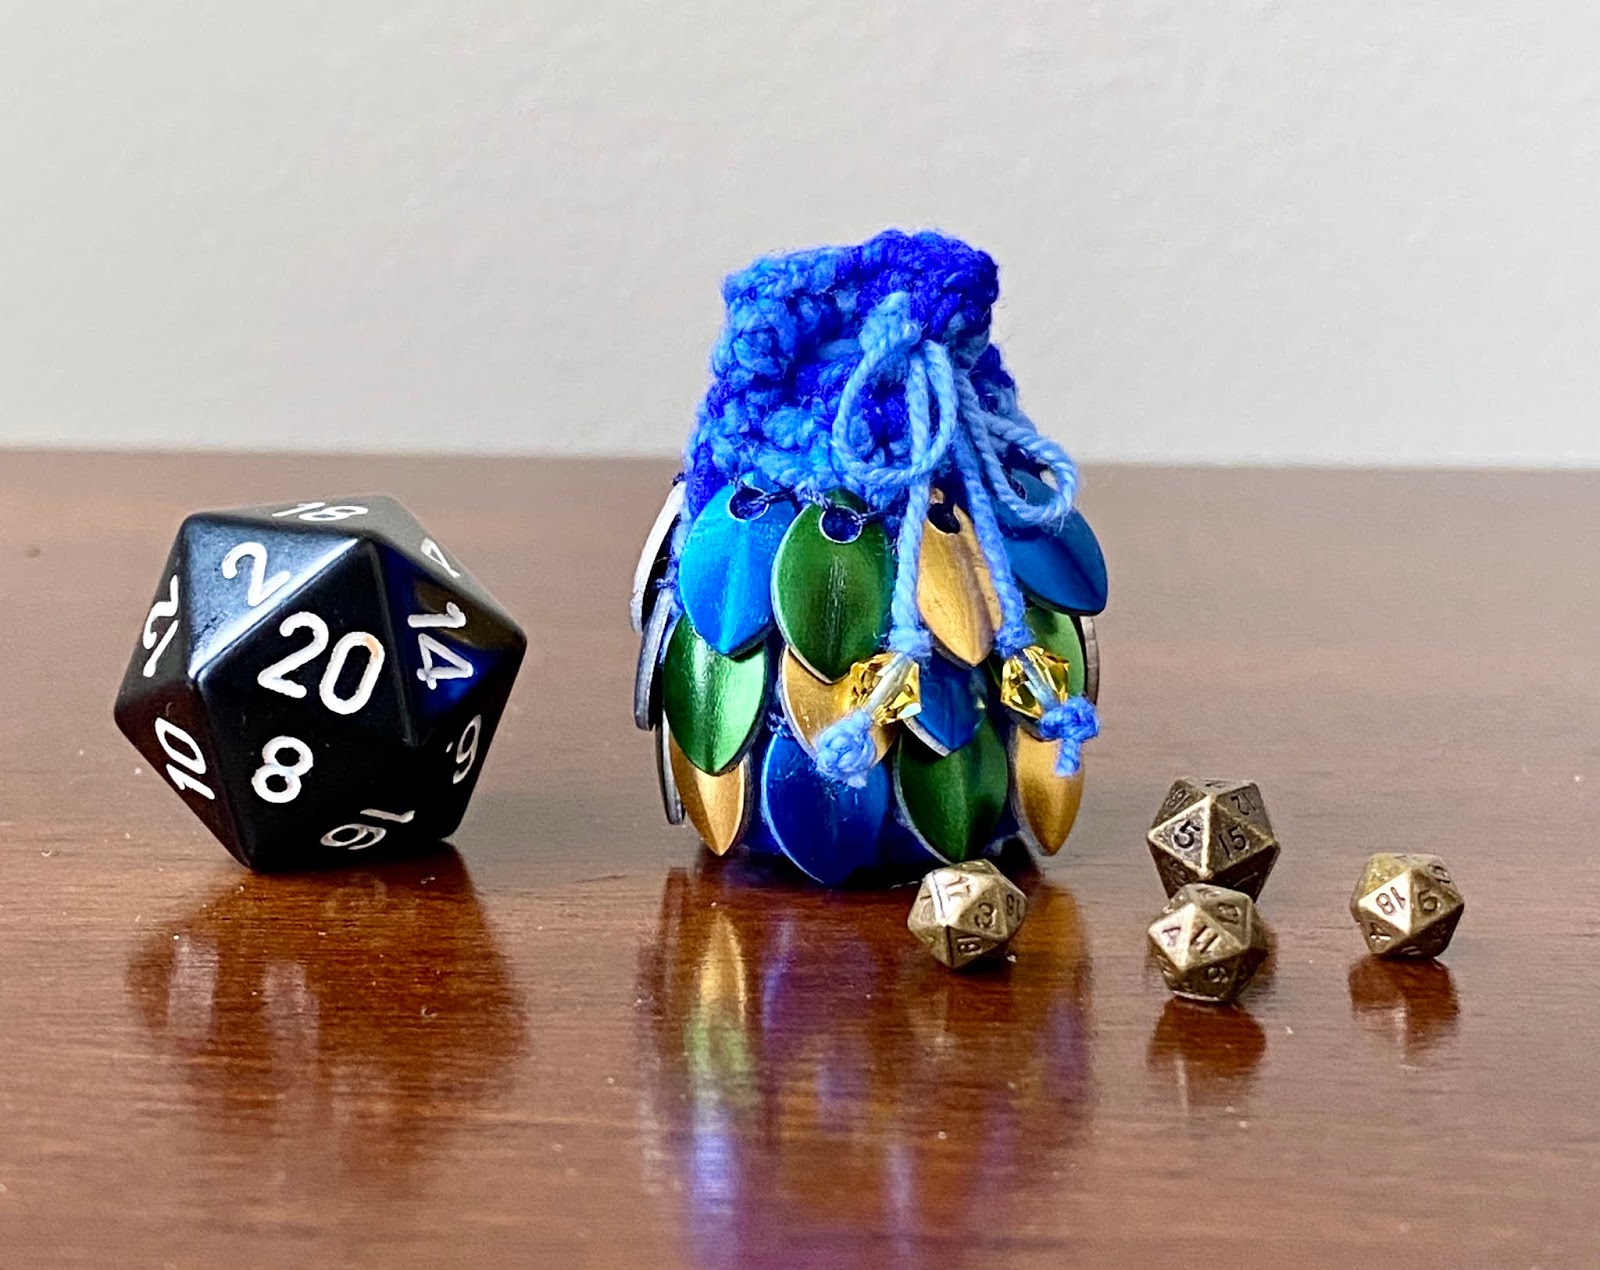
Miniature Dragon Egg Dice Bags

These little wonders were created specifically for a challenge over on Lettuce Craft.  My friend PerfectlyBohemian, who mods the Art Board, challenged us all to miniaturize our favorite crafts.  Are you kidding?  You want me to Miniaturize My Craft?  Well buckle up Buttercup.  I've got a teeny tiny craft just for you!
 
When I saw this challenge, I was so intrigued with the idea, but I had no idea what to make.  After kicking around some ideas with crafty friends, I realized one of the things I'm known for crocheting is dragon egg dice bags.  And in my jewelry making stash, I just happened to have some itty bitty aluminum scales.
I whipped out my smallest crochet hook, and some lace weight silk yarn and got to experimenting.  My normal sized dice bags are made with 144 'small' sized scales, that each measure 14mm x 22mm (or 9/16" x 7/8"), and use #4 or Medium weight yarn and a 5mm crochet hook, and are finished with glass pony beads, about 1cm wide.  The finished full size bags measure 12cm tall (or 4.5").
The miniature bags were made with 27 'tiny' sized scales that measure 7mm x 11mm (or 1/4" x 7/16"), and used a #0 or Lace weight yarn and a 2.25mm crochet hook, and are finished with 4mm Swarovski crystal beads.  The finished bag measures 3cm tall and 2.5cm wide (or 1.5" x 1").
One of the only problems I encountered was that the hook didn't fit through the hole in the tiny scales.  The pattern I use for the full size bags calls for you to crochet through the scales, to attach them to the bag.  Since that wasn't an option here, I sewed them on.  I crocheted 2 rows beyond the row I wanted to add the scales to, then went back and stitched them, so that the thread wouldn't accidentally catch the yarn, or I wouldn't accidentally sew a stitch closed, that I needed to get a hook back into.
Each finished bag is about the size of a standard D20, though one doesn't really comfortably inside.  I knew that in order to display the tiny bags, they would need tiny dice.  But I was just not up for making itty bitty polyhedral shapes.  I felt sure that way madness lies.  So I picked up some 5mm micro dice from a maker on Etsy.  I adore how cute they are with my bags! 

Saturday, February 15, 2020

Heart in Hand & Circuit Board Valentines

Despite being happily multicraftual, and owning a fancy cutting machine, and having a bunch of scrapbooking paper in my stash, I never make Valentines or other cards.  It just seems like such a big hassle for something that is so each to pick up at the store.

But, as part of my effort to be more thrifty, work through my stash, and try new things, I decided to try making a few Valentines with my Silhouette this year.  It might help that I only needed to make 3 for the Harry Potter Craftalong card exchange, since not many folks signed up this year.  I did a quick search on the Silhouette Store, and found a few card designs I liked.  So I spent about $2.20 on cutting files, and dug all the paper out of my stash. 

The hearts in hands were actually harder than they looked, and I made a mistake in my paper choices.  The hands are cardstock from the Happily Ever After line, while the red hearts are a printer weight paper.  You're supposed to weave the two layers back into one another, so there should be small red squares inside the tan squares in the center of the hearts. Unfortunately the two different weight papers didn't want to work together, so rather than mangling them, I gave up the second step of the weaving.  Instead I took the heart offcuts from the wrist band, and glued them into the spaces.  So three pretty cards for $.70 cents!

Then of course I had to make a card for my actual Valentine, my husband Jim.  He works as a programmer/software engineer, so I had to go with this adorable circuit board card I found.  When I found the piece of deep teal-green paper, I knew it had to be my circuit board.  (The example used red paper.  That would not do.  Circuit boards are NOT red!) The design also called for the little flash drive to be attached to the outside of the card, with a rivet or brad, and I didn't have any, plus I didn't really like how it looked.  And it had the circuit board as a cut out piece laid on top of a blank card base, which I didn't have a good color cardstock for.  So I played around with the file in the design software, and manipulated things until I was happy with them.

Plus it gave me something cute for the inside of the card.  I tucked it into Jim's Star Trek lunchbox for work yesterday, along with a peanut butter heart.  He found it when he sat down with all his coworkers. 

Thursday, February 13, 2020

Agate Slice Necklace & Earrings with Sari Silk

A piece I've been working on over the last week.  The front portion of the necklace is beaded onto jewelry wire, and the back is braided strips of sari silk.  It was made from a kit from Candie Cooper.  I love a good kit once in awhile to get you working with colors or supplies you might not choose on your own.
The earrings feature Czech glass flowers.

Saturday, February 8, 2020

Scrappy Virus Afghan

This afghan has been over 2 years in the making!  I started it in September 2017, as a way to stash bust.  I had 6 skeins of Red Heart Boutique Unforgettable in Dragonfly and thought I might be able to make a nice little thrown with it.  I had already made a Virus Shawl, and had seen a few patterns floating around for the Virus Blanket version.  The woman who wrote the blanket pattern also has a video of how to make it on Youtube, so I just worked from that rather than buy the PDF. 
I started with the Dragonfly, planning to do the whole throw with it, but after 4 rounds of the 4 row pattern, I felt it was a bit dull, so I dug through my stash and found I had 1 full and 1 partial skein of Petunia, so I threw in a row of that.  Here it is laid out on a queen sized bed. 
This was one of those projects that got picked up and put down often, when other things came up.  So it was well over a year and a half into making it that I bumped into a skein of Gossamer on clearance at Joann's, and threw that into the mix too. 
In the end, I think it took either 5 or 6 skeins of Dragonfly (the main blue-green), 1.5 skeins of Petunia (pink-purple-burgundy), and 1 of Gossamer (the more rainbow band in the middle, that contains blue, green, purple, pink, gold and lime).  I haven't decided exactly what to do with it yet, but it might go to a friend in Japan who was recently married. 

Saturday, February 1, 2020

Miniature Swarovski Necklace & Jewelry Display Stand

The very lovely MissingWillow on Lettuce Craft came up with the most awesome idea for our Craft Stars Garage Sale Fundraiser.  She created a tiny curio cabinet, featuring the animal friends from Lettuce Craft, and asked the other moderators to create tiny versions of their favorite crafts to fill the cabinet with.  I made a teeny tiny necklace out of a Vintaj brass connector component, 2mm Swarovski crystal beads, a 5mm Swarovski butterfly, some tiny chain and the thinnest headpin I could find!  I used the headpin for the butterfly, then used the wire I cut off of it to make the two double ended eye pins for the tiny beads. 
The necklace stand is a few layers of cardstock glued together before being cut to shape.

I actually made a few other pieces of jewelry first, but wasn't very happy with them.  I sent them off to MissingWillow, so she could use them if she wanted, or she could put them into her stash for some future miniature she might make, or she could toss them.  I was honestly surprised they ended up in the finished Curio Cabinet!
 
Turquoise seed and Czech glass beads, and a tiny heart charm.

Glass seed beads and a green Swarovski crystal drop.

Ring made from a red glass seed bead and a single jump ring.

Ring next to the necklaces for scale. 
Here's the finished curio cabinet, featuring miniatures by many of my favorite Craftsters/Lettuce Crafters.  (Photos ruthlessly stolen from MissingWillow's awesome post on Lettuce Craft.)  I also crocheted the granny square rug underneath it.  My butterfly necklace is on the top shelf, along with a shrine by MissingWillow and a Mothman by PerfectlyBohemian.
The second shelf features a fairy shrine, steampunk assemblage and photo of MissingWillow's lambs, circus shrine & scrabble tile painting from racky, and Up embroidery by sweets4ever.
The third shelf holds some micro knitting by loves2esperiment, and Easter display by pottermouth, more of my jewelry bits, and a miniature folio by kittykill.  MissingWillow did the chunky house, pottery bowl, Harry Potter book, and mini LC cookies.
The site mascot, Chaircat Mao is featured prominently in a hat crocheted by her fur-mom, pottermouth.  She sits on a cross stitch pillow by kittykill, atop my crocheted rug.