Wednesday, October 12, 2016

Making Limoncello

I recently got together with my friend Amber, for our annual weekend of canning huge batches of Christmas presents.  While we did our usual canning of jams and mustards, we also did some homemade vanilla extract, and a double batch of limoncello.  I used to make liqueurs for holiday gifts every year, but somehow in the last few years I got out of the habit.  Clearly it's time to rectify that.


Here's how to make some of the limoncello for yourself.

To make 5 375ml (12.5) bottles, you'll need:
10 large, preferably organic lemons
1 750ml bottle of vodka
cheese cloth
2.5 cups water
3 cups sugar

Note on vodka:  Find a decent, drinkable vodka that you would use to mix cocktails with at home.  It doesn't need to be top shelf, but avoid giant plastic jugs that could double as paint thinner.  For this batch we used Smirnoff and Absolut.

Because the lemons will probably have a wax coating on them, you'll need to carefully clean that off, without destroying the essential oils in the peels that give the liqueur its flavor.  There are a few ways to clean lemons, including running boiling water over them, spraying them with a vinegar & water solution, or microwaving them for short burst of time, all of which help loosen the wax they are coated with.  Check out all the methods here on Wikihow.  We went with the microwave method.

Work with just a few lemons at a time, microwaving 3 for 10-20 seconds, on a microwave safe plate.  Take the warm lemons out, and scrub them with a vegetable scrub brush under cool running water. Give them a final rinse and they dry them with a clean tea towel or paper towels, before moving on to the rest of the lemons.

Once you have all your lemons de-waxed, it's time to peel them.  Use a vegetable peeler to remove the bright yellow peel, avoiding the white pith, which is very bitter.  Try to remove the peel in large pieces, rather than lots of tiny ones.  This will help when you strain the peels out, resulting in a clear liquid, rather than a dusty, murky one.

Divide your peels between 2 large, clean, quart jars.  (If doubling this recipe you can do it with 3 jars.)  Pour the vodka over the peels, and place in a cool, dark place for 10-12 days.  After just a few hours, if you swirl the jar, you can see that the alcohol has already turned a bright golden yellow.


Once the 10-12 days have passed, it's time to make the simple syrup that will sweeten the liqueur.  Place the sugar and water into a heavy bottomed sauce pan, and bring to a boil, stirring frequently to dissolve the sugar.  Once the sugar is fully dissolved and the liquid has come to a boil, turn off the heat and allow the mixture to cool for 30 mins to an hour.  Once it has cooled, line a colander with cheesecloth and place over a large bowl.  Pour the lemon steeped vodka through the cheese cloth, making sure to strain out all the bits of peel.  Discard the peels.  Add the lemon vodka to the syrup, stirring gently but thoroughly.


Pour your liqueur into clean bottles, and cork.  Wipe down the bottles to make sure there's no sugary liquid on them, then allow to dry before labeling.  For my batch, I used 2" square kraft paper labels from Avery.  You can design your labels with their online software and print them at home.  I added some pretty lemon branch graphics from the Graphics Fairy.  Since I only have a black and white printer, I used a yellow marker to add a hint of color to the lemons on the branches.  Once the labels were on the bottles looked a little plain to me, so I added a twine bow, along with a pewter charm of a lemon slice to each bottle.


Note on packaging your sunshine elixir: We used 375 ml woozy round glass bottles with T top corks, from Specialty Bottle in Nashville.  A single batch of this recipe will fill 5 of these bottles, with a scant few ounces left over for you to sample. (A little over 1875 ml, or 64 ounces.) Of course you can also use larger or smaller bottles for your limoncello, and little simple math will help you determine how many you need.


Friday, October 7, 2016

Gather Ye Rosebuds Halloween Wreath

In May of this year my husband and I bought our first house.  For the last several months we've been getting settled in, decorating our new space bit by bit.  We've mostly worked on the interior, since summer in the South is too brutal to take on outdoor projects.  Now with the weather finally cooling down, I've been able to enjoy regular morning walks around the neighborhood with the puppy.  On our walks I've loved seeing people out in their yards, decorating for fall.  There are pumpkins and mums on every front porch, and one house covered in caution tape and spiderwebbing.  All of it has made me want to decorate our house too.  So where to start?  How about at the front door, with a creepy Halloween wreath to welcome visitors into our home?


I looked around at some of the wreaths for sale in the regular craft and home decor stores, but they were all either incredibly expensive or very poor quality.  So I decided to make one myself, to keep the cost down by the quality high.  This is the result!  I'm calling it my Gather Ye Rosebuds Wreath, and it makes me very happy hanging on my front door.  Best of all, it only cost $16.50 to put together!  Want to make one yourself?  Well then let me show you how...


You'll need:
18" burlap wrapped straw wreath base, like this one at Joann's (which I bought with a 50% off coupon)
3-4 packages of 'creepy cloth' from Dollar Tree
4 stems of black roses from Dollar Tree
2-3 stems of purple roses from Dollar Tree
Small skull from Dollar Tree
Hot glue gun
Glue sticks
Black marker
1 yard black satin ribbon (optional)
Indoor/Outdoor Command Hook (optional)


Use your marker to draw lines dividing your wreath base into quarters.  This will help you keep track of how much creepy cloth you are using to wrap around the base.  Next, open your packages of creepy cloth, and completely unfold them.  Mine were 30"x72", which sounds like a lot of cloth until you remember just how thin it is.  Gather the cloth roughly at an angle near one end.  By holding it at an angle, you will taper out one piece, while you overlay the next piece, allowing you to get good coverage, without lumps where one piece ends and the next begins.  Use a line of hot glue to attach the cloth along the back of the wreath.  Now wrap the cloth, stopping to adjust so that you don't have bare patches peeking through.  As you come to the end of the first piece, add a line of glue, and simply start wrapping the next piece over the end of the last one.


I bought 4 piece of creepy cloth, but only ended up using 3 to cover my wreath.  (I guess that 4th one will decorate my mantle!)  Don't worry if there are some ragged bits or stray strings here and there.  It just adds to the death shroud texture that we're aiming for.  Now it's time to start laying in the roses.  Remove the roses, leaves and any other bits from the flower stems.  (Mine came with a glitter covered spider or bat on each bunch.)  You'll want to remove the plastic pieces from the leaves, but not from the roses, or those will fall apart.  Decide where you would like your skull to be.  I wanted mine centered at the bottom of the wreath, with roses running up along the sides.  Give yourself a mark for the placement of the skull, but don't attach it yet.  Instead glue a black rose on each side of where the skull will be, crowding them in closer than you think you'll want them.  Add two more black roses beneath those so that the center feels full.  Now go ahead and glue in your skull, taking care to nestle it between the flowers, so it seems to be emerging from beneath them.


Now that you have your skull in place, it's time to lay in some leaves.  Use more hot glue to lay some of them flat, hanging just off the edge in either direction, partway up each side of the wreath.  This will help fill in any gaps between the roses with additional texture.  Now let's add in a purple rose on each side, between the black roses already there.  Continue layering in more roses in black with the occasional purple one thrown in to break up the color.


My roses also came with little feathery bits of plastic on the ends of the stems.  Cut these apart, and add a blob of glue to the ends, tucking them between the flowers and leaves, and place them around the wreath.  I added mine feathering off the top edges of the roses on the sides, behind where I wanted my skull, and along the bottom edge of the wreath.  Now take a look at your skull.  Mine had some paint on it, darkening the eye sockets but it wasn't very dark.  Use your magic marker to add some definition between the teeth, and along any cracks in the skull.


That's it!  You now have a chic new Halloween wreath.  Very Martha Stewart.  If Martha decided to move to a Mockingbird Lane.   I had planned to hang mine from a metal over-the-door wreath hanger, but couldn't find it in the holiday decorations.  Since none of the stores in town seemed to have them yet either, I grabbed an outdoor Command Hook from Big Lot's, and hung the wreath from a loop of black satin ribbon.


Now I clearly need something more fun and festive for the welcome mat.  Wonder what I can come up with for that...

Thursday, September 1, 2016

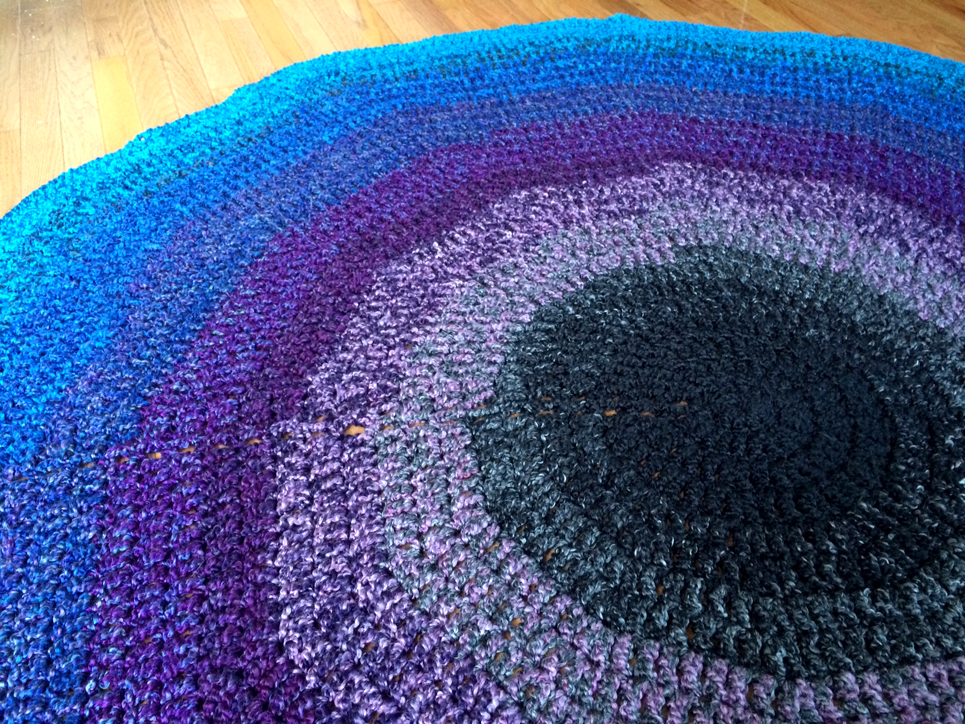
Nebula Afghan

 A few months ago I created a Mrs. Weasley Inspired Burrow Afghan for sheepBlue in the I Want to Live in the Burrow Swap.  The project helped me use up a great deal of my stash of Homespun yarn, but I still had so many skeins left over.  So I decided to use up some more of them by creating a new afghan for a friend who is battling cancer.

The pattern is the Kew Gardens Afghan from Lion Brand yarn.  But for this one, like in the Burrow afghan, I created it by holding 2 strands of yarn together, changing out one strand of color at a time in order to blend the colors from black, through grey, purple, blue, teal, and aqua.

All told it took about 20 skeins of yarn and it weighs a TON!  


And finally, one more shot with my pup, looking completely unimpressed.


Saturday, July 16, 2016

Mrs. Weasley Inspired Burrow Afghan

 I recently organized & participated in the I Want to Live in the Burrow Swap, which was a housewares swap, inspired by the world of Harry Potter.  Participants could make HP themed houseware items, or items that felt like they could be found in the Burrow, the house of the Weasley family.  I had the good fortune to be partnered up with sheepBlue, one of my Craftsgter Crushes.  She mentioned enjoying blankets to snuggle up with in the winter, and loving Mrs. Weasley's scrappy style, so I clearly had to make her a Weasley Afghan!

I dug through my stash and found that I had a lot of skeins of Lion Brand Homespun yarn in a mix of colors.  And though I searched through many patterns trying to find a scrappy way to use the mixed up colors, I just couldn't find anything that worked with the varying amounts I had of each.  Many of the colors have been discontinued so I couldn't buy more of them.  In the end I decided to try combining elements of a few different patterns I had seen, to try to make something work with what I had on hand, just like Mrs. Weasley would do.  The two main patterns I was inspired by were the Lazy Girl Crochet Blanket, which used 2 strands of super bulky yarn crocheted together in a V-Stich, and the Fast and Easy Crochet Throw, which used 4 strands of worsted weight yarn that changed out one strand color at a time to get an ombre effect. 

I used 2 strands of bulky weight, held together and crocheted in the V-Stitch.  It's made up of approximately 14-15 skeins of yarn, 9.5 of which were from my stash.  I bought 2 brand new skeins in Barley, and 4 partial skeins of various colors on eBay for about .80 cents each.  Each partial skein was somewhere between 1/2 and 7/8 of a full skein.  To create the ombre effect, you'll have to think about what colors you have, how much you have of each, and how you'd like them to progress.  I started by laying them all out and creating a "rainbow" or color wheel.  Then I made myself a vague chart, based on the number of rows I planned to do, and how I wanted the shades of color to blend.  I've included it below, but if you do this on your own, yours will vary based on what colors and amounts you have on hand.

Here's a close up of the ombre effect created by swapping out 1 strand of yarn at a time.

If you want to try this yourself, here's the basic directions for making a V-Stitch Afghan.  My "afghan" is actually big enough to cover the top of a queen sized bet!  Somewhere in the vicinity of 60"x80".  You can size yours up or down from mine, simply by increasing or decreasing your initial chain by mulitples of 6. 

1. Chain 72 (You can do this with any foundation chain that is a multiple of 6)
2. 2 dc in 4th chain from hook. (This is the V-Stitch).
3. Skip 1, 2 dc in the next ch.
4. Repeat #3 until there are two chains left. 
5. Sk 1, dc in the last ch.  This completes your first row of V-Stitches bordered by 1 dc on either end of the row. 
6. Now you're ready to start your next row, so turn the work and ch 3 for your first dc of the new row.
7. Skip 2, 2 dc in the space between the two dc that make the V-Stitch from the row below. 
8. Repeat step 7 across the V-Stitches of the row below.
9. Skip 1, dc in last ch.
10. Repeat #6-#9 until the project is the length you desire.  Finish off and weave in ends.

I added fringe by using the 'book' method of measuring.  You can find a good tutorial for it here.

Finally, in case anyone wants to know the yarns & progression I used, I've outlined them both below.  

Yarn Colors:
3 skeins Tumbleweed
2 skeins Light Blue (cannot find the real name)
1.5 skeins of Russet
1 skein Wildfire
7/8 skein Prairie
1 skein Adirondack
7/8 skein Light Purple
1 skein Barrington
3/4 skein Khaki
2 skeins Barley
1/2 skein Tan (cannot find the real name)

Progression of Colors:

Rows 1-4 Tumbleweed & light blue
Row 5 Tumbleweed & Tumbleweed
Row 6-7 Tumbleweed & Russet
Row 8-10 Tumbleweed & Wildfire
Row 11-12 Wildfire & Russet
Row 13-14 Tumbleweed & Wildfire
Row 15-16 Tumbleweed & Russet
Row 17 Tumbleweed & Tumbleweed
Row 18 Tumbleweed & light blue
Row 19-20 light blue & Prairie
Row 21 light blue & Tumbleweed
Row 22-23 light blue & Adirondack
Row 24-26 light blue & light purple
Row 27-28 light purple & Barrington
Row 29-31 light purple & light blue
Row 32-34 light blue & Adirondack
Row 35-36 Adirondack & Prairie
Row 37-38 Prairie & Khaki
Row 39-40 Adirondack & Khaki
Row 41 Khaki & Tumbleweed
Row 42 Tumbleweed & Barley
Row 42-43 Barley & Russet
Row 44-46 Barley & Wildfire
Row 47-49 Wildfire & Russet
Row 50-51 Barely & Wildfire
Row 52-54 Barley & Russet
Row 55-58 Barley & light blue

Monday, January 25, 2016

Scrappy Star Rug

Despite planning for it, I always seem to underestimate just how much time I need to spend crafting to fill my shop for the holidays.  Even though I had put aside time in my schedule for personal crafting and blogging, it all once again got commandeered for the cause.  And even after the holidays are over, I usually spend much of January trying to remake items that sold out over Christmas, with the result being that I don't get to work on much fun crafting between October and February.

So this weekend, with winter storm Jonas terrorizing the East Coast, I decided to finish a project that had been previously put on hold.  The result is my new Scrappy Star Rug!  I began this one as practice for making my Scrappy Rag Rug for noodle-bug last June.  Unfortunately, with only 1 round left to go, I had to put it on hold in order to make noodle's rug.  The pattern is also from ATERGcrochet on Etsy, and is much smaller, with only 11 Rounds, rather than the 32 called for in the round rug pattern.  Finished, mine measures 30" across.  I decided to use only upcycled tee shirt yarn when making this one and learned quickly that I prefer the un-seamed yarn available commercially.  The seams always want to pop up where you least want them, and make feeding the yarn a bit of a pain.

Yesterday morning I sat down and finished the last round, and was very proud of myself for completing a work in progress.  Then I looked down at what was supposed to be a happy little rug, and decided I was dissatisfied with it.  The body is mainly emerald green, with a round of charcoal and a round of black at the outside edge.  Overall, it was simply too dark, and frankly too boring.  So, while binge watching That 70's Show on Netflix all afternoon, I decided to add some of the looped rows called for in the round rug pattern, which had done so much to brighten up noodle's rug too. I dug through my stash and found a few balls of teal, turquoise, purple and red yarn that I made from some of my Old Navy tees that had become worn out.  Old Navy jersey makes for a very soft and stretchy yarn, which would not have worked well for the body of the rug, but is perfect for the rows of contrasting loops.  Now I can finally say that I'm not only finished with the project, but happy with it too.  And now it's off to a new home with a friend.  So long little rug!


Thursday, October 29, 2015

Have a Very Harry Christmas!

I've been keeping some of my newest projects a secret for a few weeks now.  At first it was because I didn't have all the pieces assembled yet, and later it was because I didn't want to get groans from the "It's too early for Christmas!" crowd.  But now that crafting is my full time job, I find that I'm crafting earlier and earlier for the holidays, both to fill my shop, and for my gifts for friends and family.

Harry Potter's Wand with deep red velvet ribbon.
It all started a few months ago, when I ordered some wand pendants to use in my jewelry crafting.  I had grand ideas about placing them on charm holders along with other beads and charms to represent each of those characters.  Then the "pendants" arrived, and I realized that I hadn't checked the size descriptions carefully enough.  Each wand was 4" long!  Far too big to be worn around the neck.  They sat around on my desk for a few days until I had a brain wave.  Christmas ornaments!

Hermione Granger's Wand with iridescent red & violet ribbon.
I added beautiful velvet and satin ribbons to correspond to each character's personality and am thrilled with how they came out.  Since I knew someone would ask, I've listed each one separately, as well as bundled together as a set if you're like me, and must have all four.  Seriously, someday I'm going to have a completely Harry Potter themed Christmas tree, separate from my regular tree.  Maybe it will live in my craft room to keep me cheerful during the stress of the holidays....

Dumbledore's Wand, otherwise known as the Elder Wand, with purple satin ribbon.
Voldemorte's Wand with emerald green velvet ribbon.
After finishing the wand ornaments, I started work on another set.  Horcruxes!  So far I have Ravenclaw's Diadem and Hufflepuff's Cup finished and listed in the shop.  I'm currently working on adding the other 5 Horcruxes, which will probably show up one at a time over the next few weeks.

Ravenclaw's Diadem, on royal blue glittered velvet ribbon.

Hufflepuff's Cup, on dark grey glittered velvet ribbon.
I actually posted these over on Craftster on Tuesday, before I got a chance to sit down and write a blog post.  In the mean time, they were made a Featured Project there!

Wednesday, October 28, 2015

Autumn Canning Adventures

I promised that this blog would include all my crafty endeavors, and yet I seem to have mostly posted just my jewelry projects lately.  Though I've been making lots of jewelry in preparation for the holidays, I took 2 days off last week to spend some time canning with my good friend Amber.  I love Amber for a lot of reasons, but our relationship is probably best summed up by the following card.


And while most of our time together involves a few drinks and hours of snarky conversation, we also always manage to get a whole lot of work done at the same time.  This past visit was no exception.  We made five canning recipes; 2 which were old favorites and 3 that were new to us.  I will admit right now that I didn't take any fancy staged photos of ingredients or the cooking process.  After all, I am not a food blogger, but rather a craft blogger.  I will however provide sources or links to all the recipes.


The first project was  a batch of Red Wine Jelly from the Ball Complete Book of Home Preserving.  I really can't say enough good things about this book, and the recipes in it.  It contains 400 recipes, all of which sound delicious, and all of which have been tested repeatedly, so you know they work every time.  (One of the reasons that I love this particular recipe is that it calls for exactly one bottle of wine, while many others call for 1/2 cup from a second bottle.)  I used my current favorite wine, Apothic Dark, which has blackberry, blueberry, coffee and dark chocolate notes in it.  Remember that the flavor will become more concentrated and cerntainly much sweeter with the addition of sugar.  I've also done this with a Norton wine from local winery, Reid's Livery from Alvaton, KY, which might be my favorite jelly ever due to the strong and complex flavors of the wine.  


Our next recipe was Dilly Beans, from the blog Food In Jars.  These were requested by Amber's brothers.  We made them 2 years ago, and apparently the boys have been asking for more ever since then.  They are a great way to use up lots of green beans from your garden, and produce a bright and intense dill and garlic pickle.  Amber brought some of the beautiful green Heritage Collection Jars, and the bright green beans look extra pretty in them.


While we were working on the Dilly Beans, we set the basil to steep for a batch of Basil Jelly, from the blog Sweet Domesticity.  If you check out the recipe you will see that mine did not come out the bright green color that Maria's did.  As noted in the comments section of her post, it seems that the variety of basil you use, as well as how you prepare it, can vary the color.  As the recipe has a strong lemon flavor to it, I love the golden honey color of my finished jelly.  We procured our basil from Kroger, as my tiny patio garden didn't produce enough basil for this recipe.  Hopefully I'll have a bigger garden to pick from next summer. 

I should also note that the photos from Maria's blog looked to me like 4 oz jars, but the recipe states that it makes 5 half-pints (8 oz. jars).  Since I was a bit confused, I posted a question about it in the comments section, and Maria got right back to me to let me with an answer!  The jars in her photos were actually wide mouth 8 oz jars, that just happen to look like the 4 oz variety when there is no other frame of reference in the photos.  Thanks for your help Maria!  


The jelly is fantastic.  Bright from the lemon and a beautiful herby basil flavor that I adored.  Our batch came out just shy of 5 half-pints, so I kept the open jar for myself, and have enjoyed it on toast, as well as on some glazed salmon I made on Monday.  I was able to use up some of the leftover garlic, onions, and green beans in the Vegetable Risotto as well.  I will definitely be making this jelly again next year.


After lunch Amber and I did a batch of Pear & Ginger Jam, from the blog Savvy Eats.  According to the post, this recipe was adapted from the book Canning for a New Generation, so I've included a link to the book on Amazon as well.  This recipe made a thick and chunky jam, that was sweet from the pears, but has a nice kick of heat from the ginger.


Our final recipe during this crazy day of canning was for Sweet Onion & Maple Conserve.  The recipe comes from a single issue magazine I bought last summer called Better Homes and Gardens Canning+Preserving+Freezing+Drying.  Since it would be very hard to find I've linked to the recipe for it that I shared in the Harry Potter Craftalong over on Craftster.  This stuff is utterly fantastic, and I want to put it on everything.  The onions and maple syrup are very sweet, but are tempered by the butter and fresh thyme, which came from my herb garden.  The recipe states that it will make 5 4oz. jars, but our batch would have filled 6.  We filled and processed 5 jars, one of which apparently wasn't closed well enough and came open during canning, spewing onions all over my canner.  When we realized that we still had more of the golden goodness, we filled an extra jar to be used right away.  That jar is already gone.  How you ask?  Burgers, with aged sharp cheddar, bacon, and this conserve on toasted sourdough.  I regret nothing.


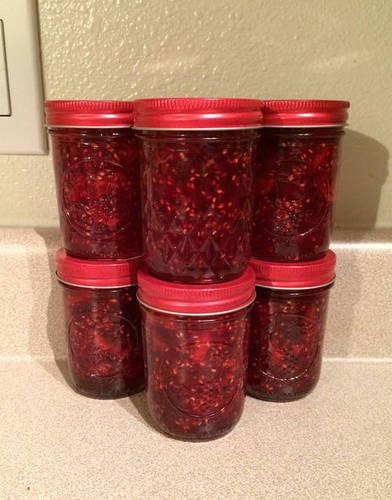
After all that canning, I somehow still was up for making one last batch of jam on Monday.  Since I had some leftover liquid pectin, and raspberries were on sale over the weekend, and my New England heart believes cranberries are a year round food, I did a batch of Cran Raspberry Preserves.  The recipe is also from the Ball Complete Book of Home Preserving.  This jam tastes like Thanksgiving in a jar.  The tart cranberries are softened by apples, honey, and the bright sweetness of raspberries.  I love traditional raspberry jam, but I don't like too many seeds.  (I'm complicated.)  I loved the consistency of these preserves.  Spreadable, with some chunks, bright red, and just the right amount of seeds.  Just for fun I used the red lids and bands from Ball that I found in Kroger.  They also had purple in store, and blue and green are available online, either from Ball or Amazon.

For now, I'm taking a bit of a break from canning to get back to crafting for my shop, and hopefully writing some more here, but I'm sure I'll be making a few more recipes for holiday gifts.  My mom has already asked for some of the Cranberry Mustard that I made for the last two years, and since clementines always start appearing in stores at this time of year, I'm contemplating Mandarin Oranges in Ginger Syrup.