Wednesday, February 21, 2018

Scrappy Quilt-As-You-Go Basket & Scissor Sheath


I recently organized a Hooker's Only Swap on Craftster.  My partner was the very talented StudioANF.  She requested a rectangular basket for keeping a few skeins of yarn in.  This one was made with this pattern from the Bernina Blog, but instead of making the fabric sandwiches, then quilting, I did 2 large quilt-as-you-go panels, then cut the basket pieces out of them.


The basket holds about 4 skeins of average yarn, in this case Caron Simply Soft.  The color scheme came out of one of her Pinterest boards, which was filled with fabrics she liked.  I noticed that most of them were turquoise or teal, with bits of flamingo pink thrown in.  So I dug through my stash for anything that fit. 

I have to say that I'm thrilled with how the basket came out, and I'm glad my first attempt didn't work out, because this is much cuter. 


Studio also had a pair of scissors on her wishlist, which I picked up for her.  Since I made my quilted panels pretty big, I had a little leftover, and made a scissor sheath to match.  It is cut out as a heart, then folded in half, with one of the tops folded down and sewn in place, with some buttons as embellishment.  Tomorrow I'll share the stitch marker and yarn cutter necklace I made her to go with it.


Saturday, February 10, 2018

Fairy Godmother Dreamcatcher


While working on a few other projects for the Fairytale Swap, I bumped into some ribbon in my stash that reminded me of the Princess Tote I was working on for my partner.  It was so pretty, I wondered what I could do with it for her, resolving to at least use it to wrap her gifts up.  A few hours later I dug through one of my containers of charms, and saw a magic wand charm, and it came to me.  Fairy Godmother Dreamcatcher!  Full of cute fairytale charms, and beautiful ribbons and fibers reminiscent of princess gowns and gossamer Fairy Godmother wings.  


The hoop is wrapped with the original ribbon, and he web is strung with a few strands of metallic silver and lilac embroidery floss held together.  In the center is a light purple Swarovski crystal heart, with a silver Fairy Godmother on one side, and a pocket watch on the other.  Below that, hung among the ribbons are a rhinestone encrusted angel wing, filigree crescent moon with a pumpkin coach hanging from the center, a magic wand, a crown, and several antique gold stars.  The fibers are a mix of ribbons, seam binding, yarn, threads, etc.  I'm really happy with how it came out, but none of the pictures quite captured the colors correctly; deep sapphire blue, bright lilac purple, burnt pumpkin orange, and a rich magenta. 


The Purple Chairs & Step Stool of My Dreams

Just before buying our house in 2016, I bumped into an Etsy seller, called Nature Inspired Crafts, that made the most beautiful furniture, and promptly fell in love with all of their dining tables.  It was an extra nice surprise that they are here in TN too!  (Kent, the owner and designer was incredibly helpful and very easy to work with.  Fantastic customer service.)  So when we moved in, I started saving for a small table for the breakfast room, and was able to buy it last summer.  The table is made from reclaimed wood, and inset with stunning iridescent tiles in deep purple and blue, that shimmer with hints of olive green, magenta and gold.  Only problem?  The fantastic artist who made it, doesn't make chairs to go with it.  What's a crafty girl to do, besides make them her own damn self?!?! 


Originally I was going to stain whatever chairs I found a solid brown, in the same stain that Kent used, but while looking around for the chairs, I bumped into some on Target's website, that had the back and legs painted in a vibrant color, with the seat in a brown stain.  Clearly the internet was telling me I needed to add some color to the chairs, to stand up to the beautiful color in the tiles.  I searched for unfinished chairs, and finally found some that I liked the shape of, from made by International Concepts for sale on Amazon for $130.  They come in pieces, which was actually perfect for me, as I could stain them all individually before assembling them. 


I began searching for colorful stain, and discovered a company called Unicorn SPiT that makes incredibly bright gel stains.  I admit that this took me a bit of trial and error to get right.  I wanted to be able to see the woodgrain through the stain, and according to their website you can dilute the stain which is VERY thick and goes on like tempera paint. I diluted it to about 80% stain and 20% water, and used a brush to apply it.  Sadly, I didn't like the results.  It was a greyed out purple, and was very streaky.  So I sanded it all back down, and bought another bottle of the stain.  (All of their colors are available on Amazon, and a few of their colors available at Home Depot.)  This time I kept the stain undiluted and used a rag to apply it.  It took 2-3 coats to get good solid coverage, and it dried a bright poster paint purple that was kinda terrible, and had me worried.  (My husband was eying them dubiously at this point.)  After everything was dry and assembled (and sanded and buffed with steel wool several times between coats), I started in on the polyurethane coat.  They got 3 coats of an oil based finish, with a day between coats to dry.  This took the bright (kinda awful) purple into a deep rich tone that I love.  Seriously, I keep going into the kitchen, and just stand there staring at my sparkling new chairs.


After finishing the chairs, I had a bit of the stain left over, and wanted an excuse to use it.  Enter the boring little step stool that lived in the corner of that room.  My husband bought it for me back when we were dating, when he started to get sick of me asking him to reach things for me in the tall cupboards.  About 12 years ago?  The poor thing is used constantly, and had gotten a bit dirty and stained, so I scrubbed it down with soap and water.  Then I sanded it with my new sander and set to work re-staining it.


I wanted it a bit rustic looking, so I sanded a little heavier in some areas, and a bit lighter in others.   It got two coats of Purple Hill Majesty on the body, and 2 coats of Dark Brown on the steps, then 3 coats of oil based finish.  Now it's in the kitchen ready to be of help again, and no longer ashamed of it's shabby appearance compared to the new cool furniture in the room. 

Thursday, February 8, 2018

We Can't All Be Princesses Tote


This was a nice quick project made for itsmereba in the Fairy Tale Swap on Craftster.  I found the sentiment repeated on one of her Pinterest boards several times, and decided she needed it on a tote.  The design was cut on my Silhouette Cameo from hot pink, lavender, and gold glitter heat transfer vinyl. 


I worried some other wannabe princess might try to walk off with it when Reba was busy with important matters of her realm, so I added a monogram on the back for her.  The cut files are both from the Silhouette Store online.

Tuesday, February 6, 2018

Briar Rose Scarf

I recently participated in the Fairytale Swap on Craftster.  My partner itsmereba mentioned that Briar Rose was one of her favorite fairy tales, and I got the idea of creating a scarf reminiscent of the rose vines that surround the castle in the story.  I wanted it to be something she could wear in the mild winter of TX, but that could also be displayed decoratively like a garland in the summer.  I searched around, certain that someone had created a pattern like I was dreaming of, and found the Belle Fleur Scarf by Michele Wilcox/Stitch Nation.  The roses are made from Bernat Satin in Bordeaux and Yarn Bee Soft Secrets in Rosebud, and the vine and leaves are Lion Brand Heartland in Joshua Tree.


I will warn that while the picture makes the scarf look simple, it was actually much more fiddly than I was expecting.  The vine and leaves are created with a foundation chain, then slip stitching all the way back down, making leaves along the way, then slip stitched again back up the other side, again making more leaves on the way.  While none of it was difficult per se, I find slip stitching in such a skinny area a bit tedious, especially when the yarn wants to turn around on itself.  The roses were just plain crazy.  I read the pattern, and tried to follow it, but it didn't make sense at all, so I checked other users comments on Ravelry, and discovered that most people didn't understand what the pattern wanted you to do.  After a lot of frogging and retrying, I did finally figure out the pattern as it was written, but I wasn't very impressed with the finished rose.  It wasn't as big and full as I'd like, so I dug around on Youtube until I found a tutorial I liked by simplydaisy, then altered her method a bit to make the roses just a pinch bigger by adding 6 more petals made from triple crochet stitches.  I've included my rose pattern below.

Rose Pattern (US Terms):
Leaving a long tail (about 10”), chain 54.

Row 1: Sc in 2nd ch from hook. Sc all the way across. (52 sc)

Row 2: Ch 1, turn. Skip next ch space, and trc into 3rd st. 4 trc in same space. (This makes 1 triple crochet shell.) Skip next ch space, sc in next space, skip next chain space, 5 trc in next space. Repeat 4 more times for a total of 6 triple crochet shells.

Skip next ch space, sl st in next space, 5 dc, sl st. (This is 1 double crochet shell.) Repeat double crochet shell 5 more times for a total of 6 dc shells.

5 hdc, sl st. (This is 1 half double crochet shell.) Repeat half double crochet shell 4 more times, for a total of 5 hdc shells.

5 sc, sl st. (This is 1 single crochet shell.) Repeat 2 more times, for a total of 3 sc shells. After slip stitching in last space, fasten off, and leave another long tail.

Working from the sc shell end, start twisting the work into a flower spiral. Use the long tails of thread to sew the petals in place.

Wednesday, January 10, 2018

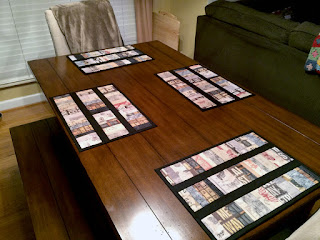
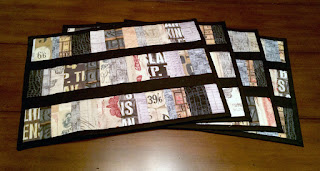
Stash Busting Placemats with Tim Holtz Fabrics

I have had the same set of placemats on our table, since my husband and I got married 10 years ago.  They were a gift from my mom, whom I later found out, had stolen them from my brother.  Sort of.  Turns out he left some stuff at her house when he moved, and she decided he wouldn't want them anymore, and gave them to me.  I moved halfway across the country with them, only to get an angry call from my brother later.  Admittedly, I never bothered to mail them back.   Mostly because they were beaded, and unable to be folded up to go in a box.  But 10 years later, and the wooden beads they are composed of, are starting to fall off, and it's getting annoying.


In thinking about it, I realized how ridiculous it is that I've never bothered to MAKE myself a set, and it was time to rectify that.  I was inspired by TheMistressT's Humongous Stash-busting, Scrappy, Place Mat Project posted on Craftster,  so I dug through my stash, and came up with a layer cake of 12" squares of Tim Holtz fabrics that I found on clearance for about $6 at Joann's last year.  I sliced and diced them to various widths, mixed up the strips, and sewed them all back together.  Then I cross cut the large panels, laying in perpendicular stripes of black, before backing and quilting them.  The backing was cut 1" larger all the way around, and folded over to become a self binding. 


The backing and batting both came out of stash as well, so it was a good project for using up extra fabric, as well as those narrow bits of batting I always have left over from making quilts.  I'm pretty pleased with how they came out, and kinda can't wait to have friends over for dinner now.  I have some chunks of the strip panels left over, and I think I might make some mug rugs and coasters to match, since the dining area and living room are one big open room.


Wednesday, January 3, 2018

Warlock Virus Shawl

My friend Edel is currently battling breast cancer.  While her prognosis is great, and it was caught early, I'm still worried about her, and wish I could be there to give her a hug.  Since I can't, I decided to whip up a shawl to hug her for me. 


The pattern is the same Virus Shawl, that I made for myself a few months ago.  There is no written pattern for this one, but there is a chart and lots of Youtube videos to get you started.  Once you do the repeat of the same 4 rows a few times, you can coast along on autopilot and ignore the chart. 


The yarn is Lion Brand Mandala, in the colorway Warlock, and was $4.97 a cake at Walmart.  I wish I had gotten a better picture that more accurately shows off the colors in natural light, but I was in a rush to get it shipped to her before Jim & I left for Christmas.  The yarn is listed as a 3 weight, but I'd swear I've used 4's that are the same thickness.  (It's definitely thicker than Lion Brand's Shawl-in-a-Ball, which is listed as a 4.)  It's 100% acrylic, and not as soft as sCaron Simply Soft, but it was not scratchy on my hands as I worked. I liked using this slightly thicker yarn, since the project worked up so fast.  I actually managed to finish it in just 1 week!


More about the yarn: It's a beautiful set of colors, but they don't blend into one another gradually.  They just jump from 1 color to the next.  I had read that in an online review, so I bought 2 skeins, afraid that the jumps would be in lousy places when I was working, and that I might want some room to spare.  I'm really glad I did that.  (Especially at $4.97 a piece, they were a good deal.)  I unwound the first part of my the cake, which was a deep purple, because I wanted to start with the creamy tan color. 


I got the first 5 repeats out of the tan and taupe, and could tell the color would jump in the middle of the next row, so I cut out the remaining taupe and moved on to the next color, mustard.  I did the same thing again with the green and teal, and when I was working I could tell that I would run out of the first skeins total length of teal before I would be done as much as I wanted to do, so I jumped over to the second skein (which just happened to start with teal), and continued.  I ended up doing the same with the deep brown, rust, deep purple and light purple, jumping back and forth between skeins to get enough yarn of each color. 


When I was running out of yarn in light purple, I switched back to the creamy tan, and did a row of single crochet around the whole thing, to give it a finished look.  I would have liked to do another whole round of the repeat in tan, but I would have needed another 1-2 cakes to get that much tan, and would have had all the rest leftover.  As it is, I have a quart ziplock bag full of mini balls of the remaining bits of color!  It measures 30" from the center back, down to the point; 60" across the top; and 42" along each side.