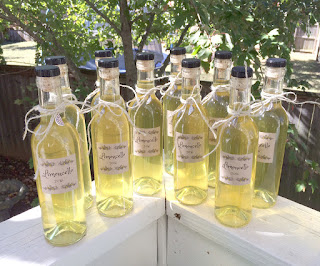
Here's how to make some of the limoncello for yourself.
To make 5 375ml (12.5) bottles, you'll need:
10 large, preferably organic lemons
1 750ml bottle of vodka
cheese cloth
2.5 cups water
3 cups sugar
Note on vodka: Find a decent, drinkable vodka that you would use to mix cocktails with at home. It doesn't need to be top shelf, but avoid giant plastic jugs that could double as paint thinner. For this batch we used Smirnoff and Absolut.
Because the lemons will probably have a wax coating on them, you'll need to carefully clean that off, without destroying the essential oils in the peels that give the liqueur its flavor. There are a few ways to clean lemons, including running boiling water over them, spraying them with a vinegar & water solution, or microwaving them for short burst of time, all of which help loosen the wax they are coated with. Check out all the methods here on Wikihow. We went with the microwave method.
Work with just a few lemons at a time, microwaving 3 for 10-20 seconds, on a microwave safe plate. Take the warm lemons out, and scrub them with a vegetable scrub brush under cool running water. Give them a final rinse and they dry them with a clean tea towel or paper towels, before moving on to the rest of the lemons.
Once you have all your lemons de-waxed, it's time to peel them. Use a vegetable peeler to remove the bright yellow peel, avoiding the white pith, which is very bitter. Try to remove the peel in large pieces, rather than lots of tiny ones. This will help when you strain the peels out, resulting in a clear liquid, rather than a dusty, murky one.
Divide your peels between 2 large, clean, quart jars. (If doubling this recipe you can do it with 3 jars.) Pour the vodka over the peels, and place in a cool, dark place for 10-12 days. After just a few hours, if you swirl the jar, you can see that the alcohol has already turned a bright golden yellow.
Once the 10-12 days have passed, it's time to make the simple syrup that will sweeten the liqueur. Place the sugar and water into a heavy bottomed sauce pan, and bring to a boil, stirring frequently to dissolve the sugar. Once the sugar is fully dissolved and the liquid has come to a boil, turn off the heat and allow the mixture to cool for 30 mins to an hour. Once it has cooled, line a colander with cheesecloth and place over a large bowl. Pour the lemon steeped vodka through the cheese cloth, making sure to strain out all the bits of peel. Discard the peels. Add the lemon vodka to the syrup, stirring gently but thoroughly.
Pour your liqueur into clean bottles, and cork. Wipe down the bottles to make sure there's no sugary liquid on them, then allow to dry before labeling. For my batch, I used 2" square kraft paper labels from Avery. You can design your labels with their online software and print them at home. I added some pretty lemon branch graphics from the Graphics Fairy. Since I only have a black and white printer, I used a yellow marker to add a hint of color to the lemons on the branches. Once the labels were on the bottles looked a little plain to me, so I added a twine bow, along with a pewter charm of a lemon slice to each bottle.
Note on packaging your sunshine elixir: We used 375 ml woozy round glass bottles with T top corks, from Specialty Bottle in Nashville. A single batch of this recipe will fill 5 of these bottles, with a scant few ounces left over for you to sample. (A little over 1875 ml, or 64 ounces.) Of course you can also use larger or smaller bottles for your limoncello, and little simple math will help you determine how many you need.


No comments:
Post a Comment