Tuesday, July 25, 2017

Sandwich Wrap Tutorial with Fusible Vinyl

While watching Star Trek TNG on Netflix the other night, my husband sighed and said, "I kinda want a Star Trek lunch box to take to work.  I would be all about that."  Since he's a software developer, working at a somewhat eccentric software company, this would fit right in.  So, being an awesome wife, I pulled up eBay, and flipped around until I found a brand new, never-been-used Star Trek TNG lunch box from 1988.  Sold!  Best part, since it's brand new, the thermos doesn't even smell like old milk. 


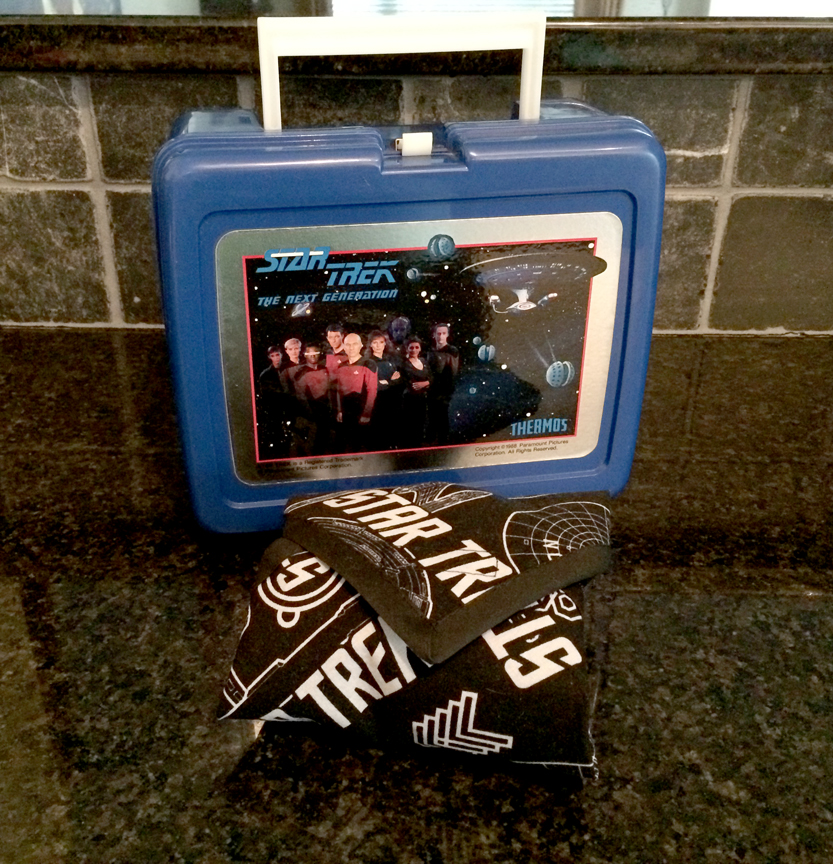
All this got me thinking.  I already pack him a healthy lunch every day, consisting of a sandwich, cup of fruit, and bell pepper strips.  I put it in a reusable snap top plastic box rather than paper bags, and put the fruit in a silicone muffin cup which can be run through the dishwasher.  In the last few years I've been getting away from products that are bought simply to be thrown away, such as paper napkins, but I've still been wrapping his sandwiches in plastic wrap to keep them dry.  When I saw fabric sandwich wraps popping up all over Pinterest a few years ago, I thought I should make some for Jim, but never got around to it.  Ordering the lunch box was the push I needed to finally make some.  The fun part about this project is that the wraps can be made with any printed cotton fabric you like, so you can make them tailored to each family members interest.  They wipe clean, can be thrown in the washing machine, will last for ages, will keep plastic wrap out of landfills, and will save you money since you won't be buying a product that you're just going to throw out! 


Materials:
Printed cotton fabric
Fusible Vinyl (I used [url=http://www.joann.com/vinyl-fuse-15-in-x-2-yards/11385135.html]Pellon Vinyl Fuse[/url], but Heat'n Bond Iron-On Vinyl also works)
Velcro
1/2" Double Fold Bias Tape in a coordinating color
Polyester Thread
Ruler
Rotary Cutter or Scissors & Pencil

1. Start by cutting a 12" (30 cm) square of your fabric, and a 12" (30 cm) square of the Fusible Vinyl.  This is easy with a rotary cutter & mat, but easily can be done with a ruler, pencil & scissors if that's what you have on hand.  I didn't take a picture of this step, because if you have not learned to use a ruler to draw a square, then you aren't old enough to use a hot iron. ;)

Note: I'm going to give directions using Pellon Vinyl Fuse, but be sure to check the directions that come with whatever brand fusible vinyl that you've purchased.  Pellon also has a great video on their site showing how to use the product.  You can see it HERE.

2. Set your iron to a medium heat/wool setting.  Lay your fabric square with the printed side DOWN on your ironing board.  Remove the backing paper from your square of vinyl.  (Hang onto that paper!)  Lay the vinyl down onto the WRONG SIDE of your printed cotton, with the shiny side of the vinyl UP, and the sticky side DOWN. 

3. Place the paper on top of the vinyl, with the shiny/waxy side down against the vinyl.  Gently run your iron over the whole space quickly, to get the vinyl partially stuck, then starting at one side, place your iron down and leave it in place for 8 seconds.  Then pick up the iron and move it over to fuse the next segment, slightly overlapping your areas.  Leave for another 8 seconds, and repeat, until you've fused the whole area.  You will need to move your backing paper, in order to get every bit. 


4. Now flip the bonded fabric & vinyl over, and replace the backing paper.  Iron again from this side, holding the iron in place for 4 seconds, before moving on to the next area.  Voila!  You've successfully bonded your fabric and vinyl. 

5. Starting partway down one side, slide your bias tape over the raw edge of the cloth.  Instead of pinning through the vinyl, use quilting clips, hair clips or paper clips to hold the bias tape in place.  (Using pretty rainbow paper clips isn't necessary, but highly recommended.  Because, well... rainbows!)  If you're using scraps of bias tape, you may need to seem them together.  For tips on that check this tutorial.


6. Set the stitch length on your sewing machine to the longest possible setting.  On most machines this is a 3.5 or 4.  On my Viking that's a 6.  Stitch along the first side, stopping when you get to the end. 


7. Remove the piece from your machine, and fold the bias tape along the next side, mitering your corners as you go.  I was not able to use the paper clips to hold my corners in place, so I used a quilt pin for that area.  Start stitching again, and repeat around the remaining 3 sides.

8. When you get back to the beginning, cut your bias tape about 1" (2.5 cm) longer than where it would meet, the fold under the raw edge about 1/4" (5 mm), and sew it closed. 

9. Now it's time for velcro.  Cut a 2" piece, and separate the male and female sides.  (With velcro the 'male' half is the harsher, plastic side and the 'female' half is the softer, fuzzier side.  No, I didn't decide that.  It's a holdover from using snaps in sewing, where there is also a designated male and female side.)  Take the female side and lay it perpendicular to the corner, about 3/4"-1" (2-2.5 cm) down from the point on the RIGHT SIDE of your fabric.  Hold in place with paper clips, then stitch in place.

10.  Take the male half and lay it diagonally across the corner, on the opposite corner from your female velcro, on the WRONG SIDE of your sandwich wrap.  Hold in place with paper clips, then stitch in place.

11.  Make a delicious sandwich, and wrap it up in your awesome new reusable wrap.  Be the envy of all your friends when you go into work with a kick-ass Star Trek lunch box and matching wrap.  Accept compliments graciously.


Bonus: You can use your wrap like a placemat to enjoy your lunch on. 

A special thanks to FiberAlchemist for her help & advice on this project!  

Wednesday, July 19, 2017

Bad Ass Bitch Necklace

I recently had the great fortune to partner with kittykill in the Feminism & Diversity Swap.  I knew that I wanted to create a piece that felt like donning armor when putting it on; something with weight to remind her of her own innate strength while fighting for equality.  The result is almost a gorget in size and area covered on the body. 
I made the chain from large individual gunmetal links and Swarovski crystal 'cosmic rings' in jet black.  Each individual element was chosen to reflect intersectional feminist principals, or to reference kittykill specifically.  I'll list a few of them...  The central eye pendant to help us stay woke, and keep an eye on The Man.  The pink crystal hearts represent one of her favorite songs, Rebel Heart by Madonna.  A large claw shaped stone to remind her that sometimes we need to use our teeth and claws to grab and hold onto our rights.  A Mexican coin to represent the 'Bad Hombres' among us, working as allies in our fight for gender equality.  A Queen Bee bottlecap as a reminder of 'who runs the world'.  A resin pendant that reads 'elusive', as reference to the fact that after decades of bold suffragettes and women's libber's alike fighting for equality among the sexes, that equality still eludes us in the pay gap, in stereotyped gender-based marketing campaigns, in how we treat the victims of sexual assault, in what toys are marketed to our children, and so many other issues.
There is an antique key gifted to me as an extra in a Craftster swap, to remind her of the strength found in friendships among women and the communities we create for ourselves.  A 'P', for kittykill's first initial; a wing to soar on; a playing die for luck in the game of life.  I'm really thrilled with how it turned out, and hopefully it will bring her as much joy as I had making it.

Smash the Patriarchy & Frida Kahlo Tea


While crafting for the Feminism & Diversity Swap recently, I chatted with my partner kittykill, and she lamented we live far apart, or else we'd each love to have the other over for tea and crafting.  It inspired me to create a tote for her.  I purchased the frame image from the Silhouette Design Store, then altered the size & shape of it, before adding in the text with a typewriter font.  It was cut out of black glitter htv on my Silhouette.  I was going for the feel of captions to old silent films.  Very happy with how it came out. 


kittykill also mentioned that Frida Kahlo was one of her feminist icons so I knew I had to create something inspired by Frida for her.  I started with a candy pink tee from Target, and did some google image searching to find a simple stencil or icon of Frida, and added a heart around it in my Silhouette Design Studio software.  Once I was finished it felt like it needed a little extra something....  So I added a rose on the back of the neckline.  All the images were cut out of black glitter htv.  As I've been working with my Silhouette, I think I've come to like working with the glitter htv best of all as it seems to stick the best and cut & weed well.
 

Harry Potter LOVE Tees with Glitter Heat Transfer Vinyl

I recently had the most amazing opportunity to meetup with 3 of my favorite Craftsters, down at the Wizarding World of Harry Potter.  Since I was going to be meeting and hanging out with some pretty amazing crafters, I knew I had to bring handmade gifts to share with them.  I purchased an svg file on Etsy that said LOVE, with the L & O being above the V & E to form a square image.  After a minor setback in which I lost my head and accidentally cut out the transfers backwards, I decided to go back and play with the image in Photoshop to make it one word written out straight across instead of the square placement, mostly to make the image work with the amount of silver glitter htv I had left.  I actually like my re-arranged version more, because it's clearer to read.  I apologize for this picture being a bit dimly lit.  We were in a Steampunk Chocolate Emporium, and it was the only pic I got of all of us in our matching shirts.

Left to right: FiberAlchemist, Abbeeroad, myself, edelC, & her daughter. 

And just for clarity, here's a pic of them lined up, with the text more clearly visible.

Sunday, July 9, 2017

Giant Star Block Wedding Quilt

On June 24th, just a few days before I was set to leave for vacation in Florida, my husband came home with an invitation to a wedding.  A wedding that would take place just 5 days after I got back!  Because a big wedding gift was not in our monthly budget, and because I believe in giving handmade gifts for such monumental occasions, I decided to see what I had in my stash to make a quilt.  I found 6 yards of a pretty cream calico.  Since I would have to make it quickly, I picked a simple pattern called the Giant Star Block Quilt from the blog In Color Order.  Best part, it only required me to pick up 8 fat quarters from my local quilt shop.  I cut the pieces and binding before leaving, and I'm so glad I did, because I came home from vacation (in summer, in FL) with a cold! 

I was sidelined for a few days before I could dive back in, but got back into it on Friday, where I got the blocks pieced, and the rows together.  Then yesterday I spent every single minute of my day stitching my butt off, to get it ready to take to the reception which started at 7:00pm last night.  With a little help from my amazing husband doing a bit of pinning the quilt sandwich, trimming googly threads, and pressing my binding, we, mostly managed to finish it on time.  I actually finished at 7:13, we pulled out of the driveway at 7:15, and got there at 7:30, with no one the wiser that we were late! 

Burrow Inspired Scrappy Crochet Pillow Trio


I've recently partnered up with the amazing pottermouth in Round 2 of the I Want to Live in the Burrow Swap.  She asked that I craft for her daughter, who has just gotten her own place.  pottermouth had made her a Ron Weasley Blanket, and mentioned she might like a throw pillow to go with it.  I found some of the yarns she had used, so it would feel like Mrs. Weasley had made both from her yarn stash and started in on scrappy a granny square pillow.


In looking for pillow forms to fill it with, I found that nothing I needed (blank pillow forms, fabric, or zippers) was on sale at the craft store, and I was plum out of coupons, so I actually went to Tuesday Morning, and picked up some random pillows to cover.  This one was a deep metallic plum purple, and I love how you get glimpses of it through the yarn, especially as Mrs. Weasley would be likely to reuse and refurbish in her crafting.  I love how scrappy and kitchy it feels.
After finishing the granny square, I had so much yarn left, that I decided to start a Mandala Pillow too, mostly as an excuse to try out this mandala pattern!  The pattern itself came from the book Boho Crochet. 
This pillow was a cute seafoam green, with some embroidery on one side. I stitched the mandala onto the front of the cover, so that it can be taken off and washed as needed.
For the final project in this series, I was inspired by all the rainbow flags all over my Facebook feed in June, and decided to make a rainbow pillow to round out the set. 

I didn't follow a specific pillow pattern for this one, but I did use attic24's tutorial on making granny stripe afghans.  I thought I'd do the entire back in ivory, with ivory joining the two sides, but halfway through I realized I didn't have enough yarn, so I added a blue stripe across the back, and used more blue to join them.  It wasn't what I planned, but I really like the juxtaposition of the rainbow against a sky blue and fluffy white.