Showing posts with label Harry Potter. Show all posts

Wednesday, December 11, 2019

Hermione's Beaded Handbag

I made this little ornament for Audania1 in the HP Holiday Ornament & Stocking Stuffer Swap.  The very last HP Swap to be hosted here on Craftster!   :'(  But don't worry, I'm sure I'll host a lovely new HP Swap in our new home, as soon as we have one to settle into.  ;)

I knew when I started the swap that I wanted to come up with an object or scene from the books that I hadn't seen done as an ornament before.  It took me a few days of pondering, but I suddenly remembered Hermione's bag of holding pretty little beaded handbag that also served as a mobile library while hunting Horcruxes and on the run from Death Eaters.  It is crocheted from 2 yarns held together, Caron Simply Soft in plum, and Lion Brand BonBons in purple sparkle.  I didn't use a pattern, just winged it based on the many other bags I've done in the past.  I believe I started with 6 sc, and expanded up to 24 in your average crochet circle, then the sides were done in hdc, because sc was proving too stiff for the shape of the bag I wanted.  I just hooked until I liked the height to the point of a drawstring, then did a row of hdc, ch 1, sk 1 st, all the way around, then finished with a round of hdc and a final row of sc.  I crocheted the drawstring and made the tassel out of the BonBons sparkle, then I dug through my embroidery thread stash, and bead stash, to find stuff to embellish the little bag with.

I hid a second ornament inside: Slytherin's Locket!

Tuesday, October 8, 2019

Mandragora Tee Shirt with HTV

This shirt was made for Ant Bee in the Madam Malkin's HP Wearables for All Occasions Swap.  I bought the SVG design on Etsy, and cut it from a sage green glitter HTV.  I'm going to be honest, this one was really hard to let go.  I think I'm going to have to make a second one for myself.  :)

Wednesday, December 19, 2018

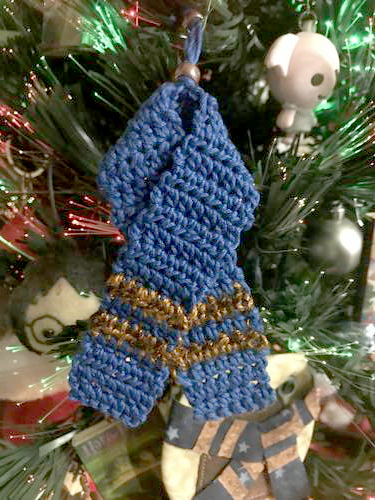
Ravenclaw Scarf Ornament - With Pattern

I recently had the pleasure of swapping with lindyv321 in the Harry Potter Holiday swap.  She's a Ravenclaw, and I decided to create a tiny Ravenclaw House scarf for her.  I looked around for patterns, but didn't like the sizes of the ones I could find, or I didn't have the right sized yarn, so I just made up my own based on what I had on hand.  I've included the pattern below in case anyone else wants to make one for themselves.


Ravenclaw House Scarf Ornament

You will need:
Sport Weight cotton yarn in your choice of colors (I used Omega Sinfonia)
3.25 mm crochet hook
needle to weave in yarn ends

Row 1: With Blue, chain 7, sc in 2nd ch from hook. Sc in next 5 across. (6 sc)
Row 2-4: hdc across (6 hdc)
Row 5: Change to bronze, hdc across (6 hdc).
Row 6: Change to blue, hdc across (6 hdc).
Row 7: Change to bronze, hdc across (6 hdc).
Row 8-41: Change to blue, hdc across (6 hdc).
Row 42: Change to bronze, hdc across (6 hdc).
Row 43: Change to blue, hdc across (6 hdc).
Row 44: Change to bronze, hdc across (6 hdc).
Row 45-47: Change to blue, hdc across (6 hdc).
Row 48: sc across ( 6sc).

Finish off, weave in ends.

Fold scarf around, and make 2 tacking stitches with some spare blue yarn, to keep it in a folded shape. Cut 2 strands of yarn 14” long, and string them through the top of the ornament. Tie a knot, then slip on a glass pony bead, and tie a second knot. Leave a gap for a hook, then tie another knot, add a second bead, and tie a final knot before trimming off the extra yarn.

***Note: For my scarf ornament, I used the sport weight yarn for the blue body of the scarf, but for the contrasting bronze stripes I used 2 strands of Lion Brand Bonbons sparkle, held together.  In my case I used brown & copper to get my bronze color.  The Bonbons are a very fine/light weight yarn that was much thinner than the sport weight, but was just about equal when using 2 strands at once.

Saturday, December 23, 2017

Harry Potter Potions Ingredients

As I mentioned the other day, one of my projects for the Harry Potter Holiday Swap wasn't a Christmas ornament.  Emma doesn't decorate much for Christmas, she requested something for her Cabinet of Curiosities.  I remembered I had some glass bottles in my stash that were just begging to be turned into potion ingredient bottles.


The Runespoor bottle was clear originally.  It was dyed on the inside with alcohol inks. I was trying for a cool marbled effect that I saw in a tutorial, but it didn't work the way she said it would.  I like the overall effect it created anyways.   I had previously used ugly lumpy brown potato shaped freshwater pearls as doxy eggs in a long ago potions cabinet, and remembered that I had several strings of pearls that have holes wayyyyy too tiny to string onto anything I have in my stash.  At first I just added the white ones, but I wanted there to be more visual interest in the bottle, so I dug around till I found some royal blue, magenta, pink, and even silver pearls too.  I've decided that since no one really knows what Runespoor Eggs look like, that perhaps they are different colors depending on the age of the Runespoor that laid them, or the time of year or day they were collected.

The gillyweed was a bit of leaf trim that I just hit the edges of with a darker green marker to give it some added definition.  The text was cut out on my Silhouette Cameo, and the rest of the decorations came from my stash.  Some black tipped brown flowers, a wooden dragon charm that I colored with some Tim Holtz distress crayons, ragged black cheese cloth leftover from a Halloween wreath, number charms I had in my jewelry stash, a Swarovski crystal ring, twine, mermaid charm, skull bead, glass Hamsa charm, etc.  I love digging through all my really random bits and bobs to find things to decorate the bottles with, and hope to do some more in future.

Thursday, December 21, 2017

Harry Potter Paper Bunting & Ornaments


Another year, another round of the Harry Potter Holiday Swap!  This year I had 3 partners, and created a wider mix of items than I have in previous years, including a banner, wooden ornaments, glitter ornaments, and potions bottles.  I'm going to post the holiday themed items here, and the potions bottles tomorrow.

My friend Edel requested some sort of banner or garland, so I created one out of book pages from an old copy of Harry Potter and the Deathly Hallows.  The 3 part design was bought from the Silhouette store online, and the paper pieces were all cut on my Silhouette, before being assembled with twine & sparkle yarn, as well as some large hole glass beads between each snowflake.  There are 20 snowflakes all together on the strand, and I included a few extra of the cut pages and backing, without the light blue snowflake on them.  Each snowflake & frame is about 4" across, and the whole thing is a few yards long. 

I knew I wanted to make an Amortentia ornament for Kira, but was nervous about doing a new technique and possibly messing up her ornament, so I did a practice Felix Felicias one first.  I created these from a tutorial online that utilized alcohol inks, which I happened to have on hand.  The words were cut out on my Silhouette Cameo, and the tops were decorated with a chain maile collar of rings, and charms in corresponding colors, with shamrocks and celtic knots for the liquid luck potion, and hearts for the Amortentia love potion.


The last set of ornaments almost didn't happen.  I bought the wooden blanks on clearance after Christmas last year at Joann's.  They are laser cut wood ornament that come flat, and have slots to slide them together to create the 3-D hearts.  Being a Harry Potter nut, the first thing I thought when I saw the stags standing above hearts was 'OMG, look at the Patronus ornaments!' 


So I picked them up for less than $1 each, and put them away in my wood crafting stash to await this year's holiday crafting.  ...And completely forgot about them.  I bumped into them by accident when I went to pull out popsicle sticks to use in a recent candle making adventure, and knew I had to put them together. 


They are colored with Tim Holtz distress crayons, which have the feel of oil pastels, but unlike pastels, they don't smear all over the place.  You can smudge them if you do so on purpose, but on their own they don't smudge.  I colored them lightly with the crayons, then used wet Q-tips to blend the crayons into a watercolor effect.  I actually made 4, but somehow only have pictures of 3.


Thursday, November 16, 2017

Harry Potter Baby Quilts, Onesies & Hats

As I mentioned yesterday, my friend Abbeeroad has recently welcomed twins into her family, and I had a wonderful time crafting for them.  Since I was making two of everything, I admit that I took a bit of a shortcut on the quilts.  They aren't traditionally pieced quilts, but rather whole cloth printed to look like it has been pieced.  The fabrics are literally called "Potter Cheater Quilt", and came from kritterstitches on Spoonflower.  They feature the Deathly Hallows symbol, tiny cauldrons, brooms, owls, Sorting hats, and lots more.  She has it in a few colorways, but seems to have since removed the coral & yellow print from her shop. 

The backings and binding came from a local quilt shop called Quilting Squares, where the ladies were quite excited to help me pick some matches.  This is the first, in shades of purple and turquoise.  I made onesies and hats to match, so each little lady got her own set. 
 
My neighbor has a small business doing embroidered baby clothes on her embroidery machine, and she took on the task of making me custom quilt labels to match each quilt.  Of course, it's just making me want a new embroidery machine all the more...

And the second one in shades of coral, yellow, and turquoise.

Meanwhile, I wanted to make another set of onesies to go with them.  I used the classic Potter font, and set up the text in the Silhouette software, then cut them from glitter heat transfer vinyl.  I've played with several types of htv, and the glitter seems to adhere the best, and wear well over repeated washings and dryings.  The hats were each made by stash-busting yarn scraps.  I can't remember the pattern I used, or I'd link it. They're quite chunky, with the body of each being made of 2 strands of yarn held together, with a contrasting band of Lion Brand Homespun.

Sunday, July 9, 2017

Burrow Inspired Scrappy Crochet Pillow Trio


I've recently partnered up with the amazing pottermouth in Round 2 of the I Want to Live in the Burrow Swap.  She asked that I craft for her daughter, who has just gotten her own place.  pottermouth had made her a Ron Weasley Blanket, and mentioned she might like a throw pillow to go with it.  I found some of the yarns she had used, so it would feel like Mrs. Weasley had made both from her yarn stash and started in on scrappy a granny square pillow.


In looking for pillow forms to fill it with, I found that nothing I needed (blank pillow forms, fabric, or zippers) was on sale at the craft store, and I was plum out of coupons, so I actually went to Tuesday Morning, and picked up some random pillows to cover.  This one was a deep metallic plum purple, and I love how you get glimpses of it through the yarn, especially as Mrs. Weasley would be likely to reuse and refurbish in her crafting.  I love how scrappy and kitchy it feels.
After finishing the granny square, I had so much yarn left, that I decided to start a Mandala Pillow too, mostly as an excuse to try out this mandala pattern!  The pattern itself came from the book Boho Crochet. 
This pillow was a cute seafoam green, with some embroidery on one side. I stitched the mandala onto the front of the cover, so that it can be taken off and washed as needed.
For the final project in this series, I was inspired by all the rainbow flags all over my Facebook feed in June, and decided to make a rainbow pillow to round out the set. 

I didn't follow a specific pillow pattern for this one, but I did use attic24's tutorial on making granny stripe afghans.  I thought I'd do the entire back in ivory, with ivory joining the two sides, but halfway through I realized I didn't have enough yarn, so I added a blue stripe across the back, and used more blue to join them.  It wasn't what I planned, but I really like the juxtaposition of the rainbow against a sky blue and fluffy white.


Sunday, June 25, 2017

HTV Shirts for Wizarding World


Next week I'm heading off to Wizarding World of Harry Potter with the amazing Abbeeroad, the fantastic FiberAlchemist, and the ever lovely edelC.  Clearly, this means that I need fun new clothes to wear on my adventure.  So this is my Wizengamot shirt.  The image was from a google image search, imported into Silhouette Design Studio.  It came out even better than I imagined it could!


Meanwhile I picked up the most adorable pair of pj pants from Torrid, that have tiny owls on them.  They were several inches too long, so I went ahead an hemmed them.  Afterwards I decided that I clearly I needed to make a top to match!  I made a Hogwarts Letter tee, with silver glitter htv, and deep red flocked htv.  Getting the flocked material and the glitter vinyl to work together was a minor trick.  I cut the envelope from silver glitter htv, and the seal from dark red flocked htv.  Then I cut a space in the backing plastic so I could nestle the seal into the letter, and iron them both at the same time. The flocked material seems to need longer with the iron, but all seemed to work out with a little extra effort.  I'm pretty excited with how adorable it is! 


Saturday, September 5, 2015

One Awesome Harry Potter Thing Swap Package

A little over a month ago I showed you the rag rug that I created for noodle-bug in the One Awesome Harry Potter Thing Swap over on Craftster.  Sometimes I get so focused on, and worried about crafting for someone else, that I completely forget that I'm going to *receive* an awesome craft in return, and this was no exception. I received the most stunning swap package, and had to share it with you.  


Noodle-bug is known for knitting beautiful cowls that I've admired for ages.  But considering I live in Nashville where the average low temperature in January is 28 degrees, I never thought to have one of her thick woolen confections for myself.  Enter Noodle-Bug the Genius.  She did her research, even contacting a friend who lives in the States to ask about the weather here.  Her answer was to make a super soft, feather-light cowl knitted from silk & angora, that I can wear without overheating.  And see those flecks of gold in the yarn?  They're beads that show a map of the stars in the Equatorial band, between the Tropic of Cancer and the Tropic of Capricorn.


I'm not sure how she did it, but she also managed to match the cowl to my winter hat.  I can't wait to wear them both as the weather cools down.  (I know everyone loves summer, but I'm really more of a fall & winter kinda girl.)


Noodle also created a beautiful hand-bound notebook, that also contains a star map, though this one is stamped in beautiful golden ink.  It's a seriously weighty tome, and I haven't yet decided what to dedicate it to, but for now it is on my desk, where I can marvel at it every day while I work.  Thank you noodle-bug!  Your work is always so awe-inspiring, that it warms my heart and makes my fingers itch to pick up a crochet hook or some pliers. 


Friday, July 24, 2015

Scrappy Crocheted Rag Rug for Noodle's Nest

Now that it's arrived at its new home, I can finally share my completed rag rug with you all!  For those who might have missed the initial post, I recently organized Round 2 of the One Awesome Harry Potter Thing Swap over on Craftster.  I was lucky enough to partner with the utterly fantastic noodle-bug, who also just happens to be my Deputy Headmistress in the Harry Potter Craftalong over there.  While we were chatting about our mutual HP love, it became apparent that we both desperately want to live in the Burror, the home of the Weasley family.  


The Weasleys are kind, loving, welcoming, and poor.  Mrs. Weasley makes handmade gifts at the holidays and sends Harry wonderful knitted sweaters and homemade mince pies.  (We are clearly kindred spirits.)  I decided that I wanted to give noodle-bug a little bit of the Weasley's loving-if-threadbare home by creating a rag rug for her flat in London.  

The pattern is from ATERGcrochet on Etsy, and calls for tee shirt (or zpaghetti/fettucini yarn), which I thought would be fun to work with, and hopefully work up quickly.  Both of those things turned out to be true.  What didn't work so well was finding the yarn itself.  Tee shirt yarn seemed to be available everywhere a year or two ago, but it has since disappeared from store shelves.  I did some looking around online and found very few sources in the US, but one seller on Etsy called Ganxxet had a decent selection and fair prices.  (Some were charging and arm & a leg!)  Ganxxet was very helpful and great to work with.  She got back to me on a question right away, and I'd order from her again in a heartbeat.  I picked up a dusky pink, and this cool white print from her.


Sadly I couldn't afford to order all the yarn I'd need, so I decided to make some myself.  I made the navy and the black yarn from tube jersey that was on sale at Joann's for 50% off.  I bought 2.5 yards of black and 1 yard of navy for about $15.  There are tons of tutorials for making tee shirt yarn out of actual shirts, and using the tube jersey is exactly the same.  (Like this one.)  The only difference was that I used a rotary cutter & mat, rather than scissors as I had much more to cut.  It took most of the morning to slice it, stretch it out, and roll it into balls, but as I'm addicted to audio books, this really wasn't a problem for me.


After nearly completing it, I decided that while I liked the rug, I wasn't in love with it.  (This is probably putting it mildly.  I might have frantically messaged Shannon over at Flew the Coop, and telling her my project felt like a cluster-fuck.  She might have suggested a cocktail.)  I knew it needed more colors to feel really scrappy, but I didn't want to spend another $50 on more yarn, and I didn't want to take it apart and start over.  So I dug through the bag of clothes I have for Goodwill and pulled out a teal shirt and a violet shirt.  Sliced and diced both, and used them to do the slip stitch rows on top.  I really love how much brighter the rug is with the additional color.  You can see how it looked before in this process picture.  The overall color scheme was softer, and now it's definitely brighter and a bit more punk, like noodle-bug herself.


Here's a detail shot that noodle took, which really shows off the  teal and violet stitches.  It's so much brighter and scrappier now!


The entire rug was supposed to be 34 rounds and measure 4' across, but I didn't get quite that far.  By the time I was on round 17 it was clear that I was nearly out of all my yarns.  It was also becoming quite heavy and I had to ship it to the UK.  So I completed the 18th round, then did 2 rounds of single crochet to finish the edges.  When it was done it measured 38" across and weighted 5 pounds!  Here it is in its new home, noodle-bug's bay window in her London flat.


I will say that while I am normally all for recycling and upcycling, I did prefer working with the ready made yarn and the yarn that I made out of tube jersey, far more than I liked working with the balls I made from the actual tee shirts.  I hated trying to hide the shirt seams.  It's very thick and squish under your feet, and has a solid weight to it that feels comforting.  In the end I'm thrilled with how it came out, but I would like to try the pattern again some day, and actually complete all 34 rounds.  Perhaps when we get a house of our own next year.

Thursday, June 25, 2015

Her Craftiness Knows No Bounds (Mostly)

While everything that I've shared thus far has been a jewelry project, beads and charms are not my only medium.  Far from it.  I've been asked many times "What crafts do you do?" I tend to answer with a cheeky "I've never met a craft that I didn't like," because I don't want to bother listing all the crafts that I enjoy.  (Except perhaps knitting.  She and I did not get along.)  The truth is that between being raised by a very DIY mom, being naturally interested in traditional crafts, and my education in costume design & construction (not to mention props and scene painting), I've learned a great many techniques that I pull from every day, and I am constantly adding to my mental list of new things to try.

Baby quilt made for my niece Mia, in 2011.
I learned to quilt as a small child, and had my first sewing machine in grade school.  I taught myself to sew clothing and costumes by using Simplicity patterns throughout high school.  By the time I was studying costume design in college, I wanted a craft to do at the end of the day to help me unwind, and so I picked up crochet.  Over the years I've taken classes in cake decorating, basket making, corsetry, painting, and floral design.  On my own I've made forays into altered art, shrines, paper crafting, soap making, canning, and just about anything else that strikes my fancy on a given day.  Why all this background?  So that you won't be surprised as new projects show up here, including all of these media and more.

Shakespeare Shrine made for pinkleo in the Shrine Swap on Craftster, 2013
My latest side project is for a swap on Craftster.  I'm both organizing and participating in the One Awesome Harry Potter Thing Swap, which requires participants to create a single awesome Harry Potter inspired project for their partner.  Each project must be a large in terms of time spent (minimum 3 hours), and it is assumed to will spend much more than that on your project.   I was lucky enough to snag my friend noodle-bug as my partner and am both thrilled and terrified to be swapping with her.  She is fantastically talented, and I'm afraid of disappointing her.

Rag Rug made for Abbeeroad in the IYP Swap - Round 26 on Craftster 
Both of us dream of living in the Burrow, the home of the Weasley family in Harry Potter.  With that in mind I decided to create a scrappy rug for noodle's home, reminiscent of something that Mrs. Weasley would make for one of her children.  I had previously created an Upcycled Rag Rug out of cotton yarn crocheted around a core of tee shirt yarn, for Abbeeroad in the Invite Your Partner Swap last year, and while I greatly enjoyed the technique, I decided that for this project I wanted to try crocheting the actual tee shirt (or zpaghetti) yarn itself.


I picked up this beautiful rug pattern from ATERG Crochet on Etsy, then headed out to Joann's to pick up some tee shirt yarn.  Only to discover that no one in the US carries it anymore!  I remember seeing it in all the craft stores a year or two ago, and there are plenty of books out with patterns to make with it, and yet there seems to be no yarn to be had!  For those of you who aren't familiar with it, it is a super bulky yarn, made from the remnants of cotton jersey.  The pattern calls for six 130 yard cones of yarn (4 of various colors, and 2 cones of neutral).  I quickly discovered that while you can order individual spools from Lion Brand for $9 each, you are unable to choose colors in any way, and just have to like whatever they happen to choose to send you!  Thanks Lion Brand.

Brescia print from Ganxxet on Etsy
While I did want a scrappy feel to the rug, not knowing what I was going to get was a bit too scrappy for me, so I started searching the net.  There is very little of it for sale on either Etsy or eBay in the US, but I did find one vendor on Etsy with a decent selection and fair prices.  Ganxxet has 80+ colors, including some really neat prints and stripes. I picked up this adorable print called Brescia, which is a white background with a black, blue and pink print that looks like scribbles of headphones, wings, flowers, hands, and tiny Union Jacks.  It reminded me very much of something Tonks might wear. Sold!  The seller was very helpful, checking a color match for me with the shade of pink that I picked out to go with it, and she shipped it really fast.


After I came to the realization that I just couldn't afford to buy more yarn, I decided to make my own with this tutorial, in coordinating shades of blue and black.  I picked up some classic rib knit from Joanns, which was on sale for 50% off.  I bought 2.5 yards of black and 1 yard of blue, which came to just $15, and spent a couple of hours slicing, stretching and rolling it.  The very slight rib in the knit became more pronounced when it was turned into yarn, but I like the variation in texture that it offered.


The entire pattern is 32 rounds and should measure 4' across when completed.  I've finished 18 rounds, and it is currently 30" wide.  Since I've officially run out of the Brescia print, and am nearly out of the blue, I'm unsure if I'm going to do the entire 32 rounds, or if I might stop around 25 or so.  As of right now, I'm worried about it being able to fit in a flat rate box to ship to the UK.  After another round or so I'm going to have to start making box checks each time I complete a row to be sure it will fit!

Friday, May 29, 2015

I Could Use a Little More Tea Time

I'm not sure what it's like where you are, but here it is raining.  A lot.  And while I do love being home on a rainy day, a few things have gotten old about this weather.  First of all the past several days of rain has meant that my dog refuses to go outside, and is spending most of her time hiding under my desk while I craft, rather than on the arm chair in my studio where she usually perches.

Astrid the Wonder Puggle, in her usual day time bed, er, throne. 
Second, it means that even with an overhead light, huge window, and desk lamp, my studio still feels dark.  So dark that I keep yawning and considering that Astrid might have the right idea by napping the day away.  But since I never have been able to nap (I just lay awake thinking about all the things I could be doing), I make another cup of tea and keep crafting.  This has led to the plan of making some new tea infusers for my shop.  But just what new themes should I put try next has got me stumped.  These are a few of my favorites, which all just happen to be fandom-inspired.

Time Turner Tea Infuser

Sherlocked Tea Infuser. How cute is the 221B key?

TARDIS Tea Infuser

Outlander Tea Infuser
What themes or charms would you like to see happen?  And what is your favorite way to spend a rainy day?