Saturday, May 19, 2018

Finally Finished Set of Dishtowels


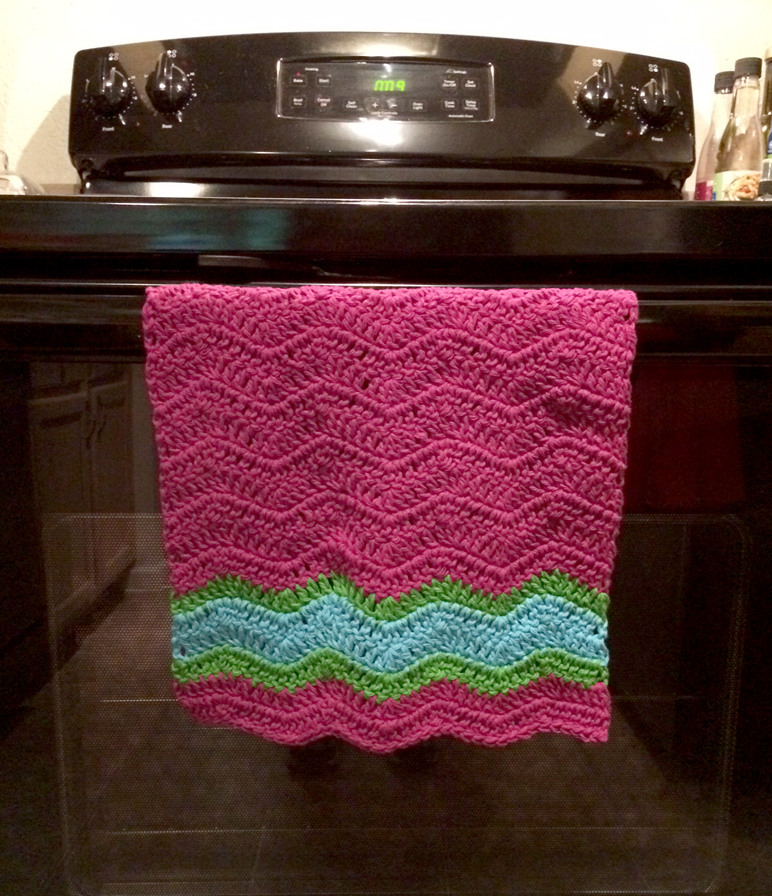
While I was putting away some yarns yesterday, I came across a partially finished dishtowel in my drawer of cotton yarns.  I had started a set of 3 dishtowels when we were in the process of buying our house back in 2016.  The colors were inspired by a dichroic glass sculpture a neighbor had given me for our new home, that contained shimmering pink, blue and green.  The pattern is a free one from Lion Brand called Cottontail Dishtowels, and the yarn is Lion Brand Kitchen Cotton, which I don't really recommend because it splits like crazy.  Update: I LOVE how well this cotton works as a dishcloth.  It's thick and sturdy, and great at scrubbing pans.  It might be a pain to crochet with, but it's a dream to clean with.

In-progress towel I finished yesterday.
Back in 2016 I had finished the first one, and had gotten through 2/3 of the second one, before abandoning it due to the move and from frustration.  The cotton is the Lion Brand Kitchen Cotton which splits like crazy as you work.  And evidently I was using a wooden hook that had a very sharp point, which kept getting caught between the strands, making the problem worse, but all my other hooks in that size had been packed. 

New towel made while devouring The Keepers on Netflix.
Since I really needed some space in that drawer, I decided to take an hour or so, and finish the in-progress towel.  While I was at it, I put on The Keepers on Netflix.  An hour later I had finished the towel, but was HOOKED on the documentary series, so I started on the third towel.  I whipped through that while watching the remaining episodes.  Best part?  I emptied out a bunch of space in that drawer for new dishcloth yarns.

Original towel I made back in 2016.


Thursday, May 17, 2018

Rainbow Sun Catcher for My Porch


After making a set of Antique Silverware & Key Wind Chimes for my mom for Mother's Day, I had a lot of bits and bobs that I had pulled out for it on my work desk, so yesterday I set about turning them into something.  I had 4 smaller prisms, and 1 larger one, that I decided to turn into a sun catcher for my porch.  I didn't want the crystal prisms to knock into one another, so I staggered the lengths of beading wire I used to string them.  I used a wide mouthed canning jar band as the base, and some chain to suspend it.

After getting the prisms in place, the piece felt a bit bare, so I added some old key charms that have been in my stash for years.  I bought them to use in jewelry, but when I ordered them the listing didn't note that they had bible verses on them, and I'm not religious, so they were just gathering dust.  After that I added some teardrop crystals in a rainbow of 8 colors.  Strands of a single color felt a bit sedate, so I ended up rotating the colors in each row, so the rainbow sort of swirls around the piece, mirroring the swirling length of the prisms.  Since a pair of wind chimes I had on the porch had recently fallen apart, I already had a spot just waiting for this piece. 

Tuesday, May 15, 2018

Antique Silverware & Keys Windchime

About a year ago my mom decided she wanted a set of wind chimes made from old silverware.  She picked up some flatware along with various trays and silver portions of old servingware to use as bases, and mailed me a whole box of stuff.  She asked my dad to drill holes in the flatware, but didn't think to have him make some in the bases.  To be honest, I wanted nothing to do with making these wind chimes!  So the items sat around for the last 18 months.  But with Mother's Day looming this year, I decided I really should get around to making them, if only to get the stuff out of my house.  There was a great deal of trial and error, and some cursing.  Ok, a lot of cursing.  But I finally managed to get something together that would be well balanced and hang straight. 


I started by matching the silverware in terms of length, shape, and weight.  While she sent about 20 pieces, only 8 could be well matched into pairs, so there are 4 pieces of flatware on each side, in ascending order of length.  To give the strands added length, they are hanging from links of Czech glass and crystal beads.  I reversed the order of the flatware on the other side, so both sides would be equally weighted.  Once I got them all on there, and evenly spaced apart, I felt like there was too much dead space between them, so I dug through my stash until I found a bag of antique keys.  Then of course I had to make more strands of beads to hang them from, and added the keys in between the flatware.  Each bead is separated by lengths of chain made from individual jump rings and oval rings, all handmade.  All in all it was about 80 crystal beads placed on headpins. 


While I wanted to throw it out the window while I was making it, in the end I'm very happy with how it came out.  And most importantly, my mom loves it.  She has it hanging outside her kitchen/dining room window, so she can hear it while they eat. 


Sunday, May 6, 2018

Stash Busting Farmer's Market Tote Bag

Since I started renovating my studio a few months ago, I've been rediscovering all kinds of supplies in my stash that I had forgotten about.  One of those was 3 balls of ribbon yarn that I bought in grad school for a costume design project, and never used.  I'm trying to use up some of this stuff to make more room in my new drawers, but had a really hard time with this yarn.  There just weren't a lot of ideas out there for what to crochet with ribbon yarn, which feels weird as something like a scarf or hat.  After some searching on Ravelry, I found this Eco Warrior Market Bag pattern.   


I worked the pattern as written, but when I was done with the body of the bag, it was way too small.  (Something that was apparent while working on it, but the pattern says it will stretch a lot, so I tried to give it the benefit of the doubt.)  I ended up frogging the last few rows, then repeating the Row 11-19 section (the same stitch pattern over and over) up until row 30, then I did two rounds each of Row 20, 21 & 22.  Here it is with 4 skeins of yarn in it.  The first version barely held 2 skeins.  I think if I were to do another one, I'd do another round of 6 increases so it was bigger around, as well as tall. 

Wednesday, May 2, 2018

Magenta Sun & Phoenix Mats

After finishing my Charming Mat I decided to use up some more of the sari yarn in my stash by making a few more mats/trivets/doilies.  I started off with the large sized trivet from the Aunt Aggie's Trivets pattern, made from a magenta sari silk.  I didn't have enough yarn to do it exactly as written, so I did Rounds 1-6 as written, then a row of 8 single crochets per chain space.  I like how it looks like a primitive sunburst.  It measures 13" across, and I think it would be nice under a plant or under a decorative bowl on a table.


Finally I had a few balls of a red-orange silk that had some breaks in it when I balled it, so I decided to try some of the smaller trivets in the pattern. I started the size small, but it looked awful in such a busy yarn, so I frogged it and went with two of the medium sized trivets instead.  They are each 9.5" across.  Due to the thick & thin nature of the yarn, the final round of the pattern was a bit too bulky, causing a wavy edge to them that I didn't like, so I ended up skipping two of the single crochets per petal in the final round.  (Specifically in the first and last sc of the previous rounds.) 

Not exactly sure what I'm going to do with all of these, but they will either go into my shop, or into my stash of handmade holiday gifts.