Tuesday, February 4, 2014

Steampunk Birdhouse In Your Soul ATB

I recently participated in the Artist Trading Block Swap.  For those of you who are wondering, an ATB, is basically a 3-D version of an ATC (Artist Trading Card).  A small work of art, to be given away and shared.  While stalking my partner's Pinterest I noticed she had pinned an altered art tag, which had the lyric "Make a little birdhouse in your soul" on it.  If you are unfamiliar with this brilliant song by They Might Be Giants, you can watch the video on Youtube.  A brief explanation is that the song tells the story of a nightlight, which watches over its owner while they sleep.  The night light tells the listener to make a birdhouse (being a safe place for something small and vulnerable) for the light it creates in their mind and soul.

And after seeing noodle-bug's amazing hand stitched Birdhouse for Your Soul, I knew I had to completely steal ahem, take inspiration from her example and create a Steampunk Birdhouse for amaryllisroze's Soul. 

The front contains an antiqued blue bird in a frame, as a reference to the lyric "Bluebird of friendliness", and a set of antiqued chipboard letters.

The first narrow side includes a window looking onto an Edwardian lady, and a metal bee, as a reference to the lyric "Say I'm the only bee in your bonnet."

The back contains a 3-D metal birdcage with a delicate Swarovski crystal heart dangling from it, in reference to the vulnerable parts of ourselves which we try to sheild.

The final side contains a bit of ruler, with a tiny hinged tin box that says "passion", and a light bulb full of glitter which is a reference to the fact that the song is told from the point of view of a nightlight.  Below that is a "Cherish" token, a clock, and the symbol for infinity, which references the line "My story's infinite".  While I was working on it, I searched high and low for a picture or embellishment with a lighthouse on it for this side, but seemed to be thwarted at every turn.  Of course I found the perfect one 2 days after shipping it.   :P

And finally, the whole thing is topped with a small bird's nest, which contains the Ace of Hearts, a gear, watch hand, a button, and freshwater pearl "eggs".  I had a devil of a time getting the nest to stay on top, so I ended up using a Vintaj brass embellishment, bent up into the shape of a bowl to support the nest.

Sunday, August 25, 2013

Overcoming a Fear of Canning - or What I Did on My Summer Vacation

For the last few summers I have wanted to try my hand at home canning & food preserving. But like many other folks have said, it just seemed like such a colossal project. What if I got it wrong and made someone sick? What about the cost of materials? It just seemed overwhelming.

But, thanks to Craftster friends, I decided to face, and ultimately overcome, my fears of canning. I set myself the challenge of learning about canning overall, and to complete a few projects in some classic home preserving categories. My original plan was to create 7-11 projects, including 2-3 infusions, 2-3 pickles, 1-2 condiments, 2-3 jams/jellies/syrups, and 1-2 dry goods mixes.  In the end, I went a bit beyond that! In fact, I doubled my plan. I ended up spending just over 40 hours, making 20 individual projects, which totaled 105 jars & bottles of food!

The photo below shows just one jar of each project.

Here's a list of all the projects, broken down by type of food. Whenever possible, I have linked to either the recipe I used, or to the book the recipe came from.

Infusions: Completed 2 projects
Red Raspberry Vinegar from Put ‘Em Up! 
Blackberry Bourbon from Put ‘Em Up! 

Pickles: Completed 5 projects
Bread & Butter Pickles - 6 quarts, from Ball Pickling Spice directions
Cucumber Dill Spears - 2 quarts, from Ball pickling spice directions
Pickled Carrots & Parsnips - 3 pints, from Put ‘Em Up! 
Zucchini Pickles - 8 pints, from Food In Jars
Pickled Brussels Sprouts - 4 pints, from Food In Jars


Salsas: Completed 3
Heirloom Tomato Salsa - 3 pints, from Put ‘Em Up!
Garden Salsa - 5 pints, from Ball Complete Book of Home Preserving
Jalapeno Salsa - 6 half-pints, from Ball Complete Book of Home Preserving


Condiments: Completed 4
Bruschetta - 2 batches of 8 half-pints, from Ball Complete Book of Home Preserving
Boston Lager Mustard - 4 pints, DONE on 8/2/13 (Adapted from Oktoberfest Beer Mustard Recipe)
Zucchini & Pepper Relish - 5 pints, from Ball Complete Book of Home Preserving
Caramelized Red Onion Relish - 3 pints, from Food In Jars

Jams & Preserves: Completed 5 projects
Norton Wine Jelly - 4 half pints, from Ball Complete Book of Home Preserving
Cranberry Syrup - 4 half-pints, from Food In Jars, DONE on 8/2/13
Mojito Jelly - 4 half-pints
Mimosa Jelly - 6 half-pints
Low-Sugar Blueberry & Champagne Jam - 3 half-pints, adapted from Ball Pectin Packaging Recipe

Dry Goods Jars: Completed 1 project
Cajun Seasoning Blend - 12 batches of 1/2 c. each, DONE on 8/24/13

MistressJennie's Cajun Seasoning Blend
Makes one .5 cup batch (I multiplied this by 12)

3 T Salt
1 T Paprika
1 T Onion Powder
1 T Cayenne
1/2 tsp White Pepper 1 1/2 tsp Thyme
3/4 tsp Black Pepper 1/2 tsp Oregano


Finally, I will leave anyone who is still reading this, with a few words wisdom for those who wish to delve into canning.

#1. Get the Ball Complete Book of Home Preserving. It is totally affordable from Amazon, but you can also certainly find it at your local library.

#2. Read everything about the canning process first. And read about it in the Ball Book. Their recipes have been tested and perfected. If you find a shiny looking book full of pretty pictures by someone else, by all means, check it out too. But consider the Ball Book the bible of canning. Everything I made out of it came out exactly as described.  (I have also had very good luck with Better Homes & Gardens canning publications.)  Read it a few times, so it's ingrained, then you won't be as scared of making a mistake mid-project.

#3. Read the whole recipe you are about to create. Double check to have everything you need before you start. Then read the whole darn thing through again, just to be certain.  I like to start my canning adventures with a clean kitchen.  I do any dishes the night before, and make sure to wipe down my counters before I start.  Then I pull out my canner, and all the ingredients.  I measure out everything before I start cooking anything.  If everything is clean and organized and in place, you won't be scrambling to measure the sugar, with a pot of fruit bubbling over on the stove.

#4. Start with something simple, that you won't mind eating all of right away, if the jars somehow don't seal. And something that doesn't require expensive ingredients. If you are growing a pot of tomatoes on your deck, or your neighbor gives you 30 zucchini, try something like salsa or zucchini pickles.  Bananas Foster Butter cost me all of $4 in ingredients.

#5. Before buying a giant canner, check to see if a friend or relative has one you can borrow.  While you're at it, see if anyone in the family has mason jars they'll let you have. You will need to buy new lids and bands, but they are *much* cheaper than buying whole brand-new jars.  If you want to try small-batch canning (2-4 jars of food at a time) you can use any regular stock pot you have, provided it holds enough water to cover your jars by 2-3 inches, and get the the Preserving Starter Set from Ball, which runs about $15.  It will totally be everything you need to do a few small batches to see if you like canning and you will use the jar lifter tongs, lid wand, and headspace tool for large batches too.

#6. When the pandemic is over: Go to your local farmer's market, and see if they are offering any canning classes, or canning supplies & coupons. My market has been doing classes throughout the summer, and their organizer booth has been handing out huge amounts of coupons. The individual vendors themselves have also been giving away batches of pickling spice & salsa spice mixes.  A mix is a great place to start. You won't have to shell out for multiple jars of individual spices, and can see if you like canning or not.

#7. Given the choice between trying jam or jelly first, try a jelly that doesn't require you to do any peeling/chopping/straining. There are lots of recipes that use pre-bottled juice, like Pomegranate Jelly, which uses Pom Juice. Once you see how easy a jelly like that can be, move on to more labor-intensive jam, or a jelly you have to chop & strain.

#8. Have fun, and give yourself permission to fail. Don't freak out if your jelly is a bit soft. Just pour it over ice cream and call it sauce. And don't worry if a few jars don't seal. Just use it up at home, or give it to friends to use right away. Out of the 105 jars I made this summer, about 10 didn't seal. It annoyed me at first, but then I tasted the stuff I made, and I didn't feel one bit bad about indulging in the delicious fruits of my labors. (Seriously, that Sam Adams Mustard is amazing on bratwurst. )

2020 Addendum:

#9. If your jars have not sealed, or the food has somehow gone bad, it will be ***obvious***.  If you open a jar and find mold, fuzz, see bubbling, or smell a nasty rotten smell, then your food is bad.  Dump it out.  You will never eat something you canned that looks, smells, & tastes great, and get sick.  It just won't happen.

#10. While you can reuse old jars, you do need new lids when canning.  Unused canning lids have a shelf life of about 5 years, after which the glue on the rim dries out, and prevents your jars from sealing.  If you don't know how long those lids have been open, toss them out, or use them as lids for things that don't need to be canned, like storage for buttons, or even cookie-mix-in-a-jar gifts.  Go get a fresh box for canning your awesome garden harvest.  They are cheap.  About $1.50 for 12.  I promise you it's worth it.

#11. This chopping tool actually works.  It's a lifesaver if you're making salsa, or anything else that requires dicing several pounds of produce.  I didn't think it would, but my friend Amber who does lots of canning with me, brought it over once, and it worked so well for us, she bought one for me for Christmas.

Saturday, June 22, 2013

Shakespeare Shrine

This is another shrine I made for pinkleo in the Shrine Swap, and was based off her request for “anything Shakespeare related”. 


The base is an ATC Shrine Kit from Tiny Things are Cute, along with the tiny books and tiny tankard.  I painted, stamped, and “shimmered” the shrine base pieces before assembly.  (I have to say that Linda Cain's tutorial over on FRIENDS in Art was incredibly helpful!)  The image of Shakespeare himself is actually a vintage cigarette card from 1924.  Yep, it’s just about 90 years old! The crown on Shakespeare and the one on the skull, as well as the “play” charm, pawn, heart lock, stone owl, letter beads and skull bead all came out of my stash. The scroll of paper at the top reads, “He was not of an age, but for all time,” which is a quote about Shakespeare by fellow playwright Ben Johnson. 


Many of the items in the shrine are references to famous lines from Shakespeare’s plays.

Crown on Shakespeare:
“My crown is in my heart, not on my head;
Not decked with diamonds and Indian stones,
Nor to be seen: my crown is called content:
A crown it is that seldom kings enjoy. – Henry IV

Crown on skull:
“Give me my robe. Put on my crown. I have
Immortal longings in me. Now no more
The juice of Egypt’s grape shall moist this lip.” – Cleopatra, Antony and Cleopatra

Heart: “A heart to love, and in that heart, Courage, to make love known” – Macbeth

Skull: “Alas, poor Yorick, I knew him.” - Hamlet

Pawn: "My life I never held but as a pawn to wage against thy enemies” – Kent, King Lear

Tankard: “I would give my fame for a pot of ale and safety” – King Henry V (my very favorite Shakespeare play)

Shell: “My bounty is as boundless as the sea, my love as deep; the more I give to thee, the more I have, for both are infinite” – Juliet, Romeo & Juliet

Owl: “Believe me love it was the owl,” which is actually from the film Shakespeare in Love ;)

Shrine to the Goddess of Crafty Inspiration

This shrine was created for Pinkleo in the Shrine Swap.  It is an assemblage shrine to someone we all worship, the Goddess of Crafty Inspiration.


The wooden frame came from the dollar store, and the bits and bobs that make it up came from my stash, work, my car, the craft store, Knickertwist’s garden, and a many came from sheepBlue in a bundle of goodies she sent me in the IYP 23 Swap.  (sheepBlue, can you find all nine?)


Metal tag, acrylic crystal jewel, thimble, charm, and domino.


Vintage glass button and wooden thread spool.


Burned out headlight from my car, and carnelian stones to lend energy to craftiness.


Vintage game token, buttons and a tiny Delft shoe.


Bird's nest with a broken rhinestone earring, freshwater pearls, and vintage buttons.


Vintage watch face, tin, and pen nib charm.


Vintage vial full of seashells, bottle of freshwater pearls and Swarovski crystal beads, shell, metal rose, and sleeping moon face.


Copper key, broken enameled bumblebee earring, wooden letters, lace, ceramic owl bead and a piece of licorice root.

For anyone interested in the process, I first painted the entire base in black craft paint.  The cubbies were then painted with a crackle medium, so that the over layers of paint would crack to reveal the black beneath. Next of course, is the contrast paint, which crackled nicely over the crackle medium.

After that, I laid out all the items where I wanted them, and then took pictures so I wouldn't forget where anything went!  Next I glued in the very back layer of items.  (The things that lay flat against the back.)  The paper items were put in with archival safe book binding glue, and the more solid items were put in with E6000, the best glue ever made.  After those all dried, it was time for a layer of standing items, and the gluing and waiting process repeated in that way for several more sessions.  I usually let the shrine rest for at least 8 hours after putting things in.  Some items were after thoughts, and were a little tougher to arrange after other components had gone in, like the lace behind the key in the bottom right box.  That was inserted with tweezers and toothpicks well after the key & “MAKE” letters. 


The metal pieces on the front came from my stash of Tim Holtz goodies.  I used some Vintaj metal paint in agate to highlight the words, and wiped it off the front, and distressed them slightly with a Vintaj reliefing block.  After all that was done, I painted the back burgundy, and distressed it with a sanding block, before stamping it, and highlighting the stamped areas with a gold gel pen.  Finally, I added a row of fabric measuring tape around the outside edge.


Friday, October 28, 2011

Full Sized Witchy Potions Cupboard

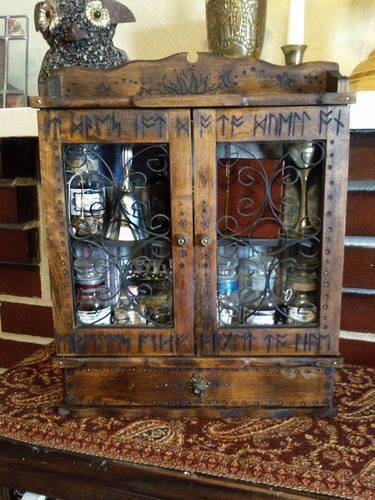
About a year or so ago I found a little decorative spice cupboard in a junk shop near my house.  The moment I saw it I knew that I wanted needed to turn it into a witchy potions cupboard for the lovely Knickertwist  Since then it has sat around my house awaiting an excuse to be built and sent to her.  Thankfully that excuse came up in the guise of the Back to Hogwarts Swap organized by pinkleo.  Sadly I can't seem to find the before pictures I took of the cupboard. 

[b]Edit: For size reference, the cabinet is 15" tall, and 12" wide, with the doors closed. (Thanks Knicker!) The shelf in the background is actually my mantle, and it is sitting on a bookshelf.

And a great big THANK YOU! to cackle and rackycoo for all their help and advice while making this project![/b]

Here's the outside of the finished cupboard. 


I used a wood burning tool to burn in the runes onto the front.  They read "It does not do to dwell on dreams, and forget to live."


The top also has a celestial pattern burned into it, and random wonky dots burned up and down the front.  After burning the outside of the cupboard, I re-sanded it, so the insides of the burned areas would be a little dusty.


The bottom also contains a small drawer that I filled with magical bits and bobs.  More about those later...

Here the doors open to reveal the ingredients inside...

Let's get a closer look at the top shelf.


We have a bottle of rose petals from a first love, a silver bell, a "Miracle Elixir of Life" patent medicine bottle from the 1880's (the purple one), a tiny basket containing vials of Scarab Beetle Eyes & Powdered Unicorn Horn...


a tiny Grimoire, and a silver chalice for serving up bubbling potions...


The Grimoire has notes, lists of magical items, and quite a few potion recipes, including this one for a Passion Philtre:

(Incidentally, these are all real recipes, safe for human consumption!  Most of the recipes are for homemade liquers.)

And the lower shelf... In the larger bottles we have Dragon Heartstring (variegated gold metallic yarn and variegated red ribbon crocheted together), dried Aconite, Blessing Seeds, Dried Doxy Eggs (lumpy dull brown potato pearls), and a bottle of Bezoars.


In the tiny bottles we have Pearled Phoenix Tears, Mugwort, Peruvian Instant Darkness Powder, Beetle Wings, and Sneezewort.


Inside the drawer we have a nearly empty spool of red thread, a tiny bundle of phoenix tail feathers, some rune dice, a golden key, a buckeye from my yard, a Nazar, and an amulet to protect a loved one.  They aren't pictured, but there are also two candles tucked in the drawer, one red and one white, for use in various spells.

So there you have it.  A full sized potions cupboard for my favorite witchy friend, Knickertwist. 


Saturday, January 22, 2011

TARDIS Matchbox

I recently was "strong armed" by the awesome Pinkleo into participating in the Matchbox Swap Round 4.  My partner spidermom is a big Doctor Who fan, and had lots of TARDIS themed items on her Wist.  Since they are both rectangular, I thought the TARDIS would be a great choice for the matchbox I was going to build her.   I used an online template from Swap Bot for the box itself.  (Though the PDF wouldn't really open for me.  I had to take a screen capture of it, and size it up.)

After coming up with the right sized box, I found blueprint images of the TARDIS online, and cut down the front and tweaked proportions till it fit the size of the box front.  Then just cut and pasted together in Photoshop.  I printed it, along with the manual cover on the only sheet of blue card stock I had.  Thank goodness it worked the first time!  The printed lines were all gone over with superfine Sharpie, and the upper windows were cut out and backed with vellum. The doorknob is a little metallic scrapbooking embellishment.

Matchbox, with all it's goodies packed inside:

When the tray is empty, you always have the Doctor to keep you company.

All the goodies unpacked, including a resin bottle cap pendant, AB beads, a bone bead, tiny TARDIS Instruction Manual, two keys to the TARDIS, a paper tag, pin back, clip, blue buttons and beads, blue acrylic drops, a copper and brass ring, stamp from China, evil eye bead for protection, star charms, hematite beads, hook clasp, an angel wing charm, 60's-esque teapot, leather "Travel" tag, s-hook clasp, and a cookie fortune.

Detail of the necklace.  I made a ton of these charms in the Steampunk Charm Swap, and have been meaning to make necklaces out of them ever since.  For those of you who are curious, I believe it's a Leinenkugel's Fireside Nutbrown Ale cap.
[img width=500

You can't be flying about time and space without any idea how to operate the crazy box, so I made a tiny TARDIS Instruction Manual

Inside of the Manual

Possibly my favorite find from my stash, the fortune:

I should probably note that when I came up with this idea, I had never seen an episode of Doctor Who before.  I chose most of my bits & bobs just by going for items that related to traveling, and the same shade of blue as the TARDIS.  Since I finished the box and mailed it a week ago, I started to get curious though.  In the last week I ended up finishing Series 1, and just started Series 2 this morning.  While David Tennant is adorable, and I'm sure will grow on me soon, I already really miss Chris Eccleston who I was nursing a bit of a crush on.

*Edit: I have since learned to love and adore David Tennant who will always be "My Doctor".

Saturday, November 27, 2010

Woodburned Piecepack Game Set

I just completed organizing the Decked Out for Deathly Hallows Swap with Ex_Gratia & Pinkleo in preparation for the release of Part I.  The swap required 1 wearable item to don for the premier, 1 game, toy or accessory to play with while waiting in line, and 1 edible item to enjoy during the film. 

My wonderful partner Andromeda007 wanted a game she and her husband could play together or with friends.  My husband Jim loves playing games while I do not, and he pointed out that a kitschy HP themed game would just gather dust.   He also pointed out that to get a game that was fun to play, you would have to test it a lot to make sure it didn't go on for hours, or be over in 5 minutes.  That it should be easy to learn but still pleasurably challenging to play, etc.  In the end, he proposed the idea of a Piecepack.  A Piecepack is the board game equivalent of a deck of cards.  It is a set of pieces that can be arranged in nearly limitless configurations, and allows users to create their own games with it, just like you can play poker, eucher, hearts, bridge, etc with a single deck of cards.


I wanted my game to feel old, in that way that many things in the world of Harry Potter are timeless.  I settled on making all the pieces out of wood.  I was able to pick up most of them at the craft store, but the 3" wooden tiles needed to be ordered offline.  I got mine at Craftparts.com.  I created the images for the coins and tiles in Photoshop, then flipped them over digitally and printed them on a laser printer. 

I used the transfer tip on the wood burning tool to transfer them to the pieces.  Most of the pieces were then woodburned with a detail tip, though the tiny suits in the corners of the tiles were just too small to burn. I traced them with a black art pen that doesn't bleed when used on wood.  All the pieces were painted with a thick coat of watercolor, so the wood grain would show through.  Then the empty areas were stained with Chartpak wood stain markers which I freakin' love.  (They are available in tons of colors at Michael's).  I also gave them all a few coats of a clear acrylic to protect them. 

The really neat part about it is that it is in the public domain, so anyone can create games for it, and most get added to the games page at www.Piecepack.org, and sites like it.  The game set already had 4 suits, which I felt were *mostly* already HP themed, and just needed a tiny bit of tweaking. 

The firey red sun for Gryffindor. 
A majestic blue moon, for the Ravenclaws. 
The green crown for the ambitious Slytherins. 
And the suggested fleur-de-lis traded out for a yellow leaf for the earthy Hufflepuffs.

The suits each have 6 tiles, 6 coins, and a die, each numbered Ace, zero, 2, 3, 4 & 5.


Each piecepack is supposed to have 4 pawns, which I made out of the smaller wooden people I found at Hobby Lobby.  But when I ordered the wooden tiles online for the board pieces, I saw the "2.5" tall girls", which are the larger set of pawns.  I thought they were so cute, and looked like they could be figures in robes, so I made an extra set of pawns. 

Some of the piecepack games require a set of game pieces called an "Icehouse Set", which are 4 sided pyramids, made of plastic.  I didn't want to order the sometimes expensive pieces, plus I didn't think they being plastic would fit with the feel of the wooden game pieces I had already created.  So I used wooden flower pots, with a gouge mark burned into them.  When you stack them with the gouges all facing the same way, you get which way your player is facing in the game.  Purists might not like my plan (Jim didn't).  But I think it's a good compromise to the pretty wooden set. 

Here are some detail shots of the coins and dice:


Since the games are all in the public domain, it's also okay to tweak them as desired.  Jim found me a "Wizard's Dueling Game", which I felt was practically written with Harry Potter in mind.  I retyped the rules, changing a few names & terms to suit the theme, and ended up with a game I called "Dumbledore's Army", which allows you to practice Stunning, Disarming & Shield Spells in the Room of Requirement.   ;)

I knew I needed to make a container for all the parts and pieces to the game.  DH suggested a drawstring pouch, but since he had just bought me a new wood burning tool, I opted for a wooden box, that I burned then stained with Chartpak woodstain markers.


If you're interested in games, be sure to check out www.Piecepack.org for various games, printable pieces, and more.  (I'm in no way affiliated with them, I just found their site very helpful!)